Disclosure: This post may contain affiliate links; if you buy through them, we may earn a commission at no extra cost to you.
As an Amazon Associate I earn from qualifying purchases.
Safety & accuracy: DIY work involves risks. Use proper PPE and follow local codes and tool manuals. Plans/measurements can vary, verify all dimensions and materials before cutting or wiring.
Safety & accuracy: DIY work involves risks. Use proper PPE and follow local codes and tool manuals. Plans/measurements can vary, verify all dimensions and materials before cutting or wiring.

Free plans to build a simple, cheap yet effective wire caddy to help pull and store cables.
While planning my structured wiring project I wanted an way to easily pull cable bundles. When professional cable contractors come and pull data cables they show up with a bunch of cable in pull boxes. When they need to pull a bundle, they set up their boxes and pull one cable from each. Whatever is left over gets used for the next job.
If you're running structured wiring in your home... there is no next job. You may buy 2 or 3 1000' boxes of Cat6 for example. What do you do when you want to pull 6 or more cables in a single bundle?
What You'll Need
Materials
You can build your cable rack to suit your needs depending on how many spools you'd like to hold so I won't include actual quantities of materials.- 2x4's or 2x3's
- 1/2" Metal Conduit
- 6" PVC or Drain Pipe
- Cardboard
- 1" 1/4" Bolts
- 1/4" Nuts
- PVA Glue (wood glue, school glue)
- Pocket Hole Screws
Tools
- Power miter saw or miter box
- Drill
- Kreg Pocket Hole Jig
- 3/4" Spade Bit
- 1/4" Steel drilling bit
- Pliers
- Straight Edge
- Compas
- Utility Knife
- Pencil
Step 1: Homemade Cable Spools
The first thing you'll need to do is pull the cable out of the pull box (or spool) and re-spool it on your own spools. I couldn't find any empty spools that were cheap and could be purchased in small quantities so I came up with an affordable way to make some using cardboard and 6" PVC pipe. The 6" diameter should be well within the limits for the safe bending radius of most cables but double check to be safe.At Home Depot there's a drainage pipe product called Smoothwall that is about half the price of regular PVC schedule 40 which can be used instead. Cut as many 6" long lengths of the PVC as you'll need spools.
To keep the the wire from falling off the ends we'll use cardboard. Draw a 7" radius circle using a compass (or whatever, this doesn't have to be perfect) and a 3" radius inner circle (this needs to be more exact.) Cut out the larger circle. Then using a utility knife and straight edge, cut a series of slits in the center circle as shown.
You'll need two of these cardboard spool ends for each spool.
Next, place the PVC pipe over the cardboard and fold in the center flaps so you can glue the cardboard to the inside of the PVC pipe.
Set your spools aside in a safe place to dry while you build the frame.
Step 2: Build The Wire Rack Frame
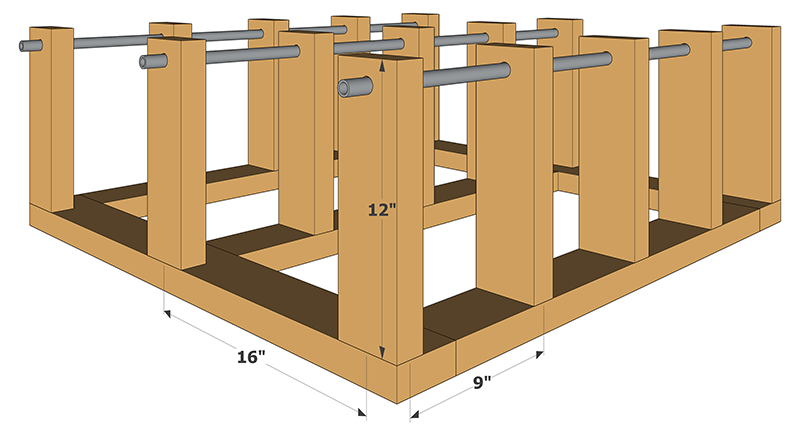
Because you can build your wire rack to whatever size meets your needs for the number of spools you'd like to mount, I won't go into many details on the construction. It should be pretty easy to figure out. Instead here are the main dimensions you'll need.Build a frame using 2x's that is deep and wide enough to accommodate all the vertical members you plan to mount. Attach the frame together with glue and pocket hole screws.
Mount the vertical 2x's (with the hole on the top) so that they're spaced 9" on center on each row and 16" on center between rows. You don't need to have as many verticals as I have. Using just one on each end of the row should suffice and allow you to mount different sized spools in the future.
Cut your 1/2" metal conduit so that it's 3" longer than the outside width of each row. Drill a 1/4" hole on each end all the way through the conduit. Attach 1 nut and blot to one end. Next slide the conduit through the holes in the vertical members, mounting your spools one at a time as you pass each vertical member. Once you have all the spools mounted on the conduit, attach another bolt to the other end to keep the conduit from coming out. Use a wing nut on one or both ends to make it easier to swap out spools.
Tips For Using Your Wire Caddy
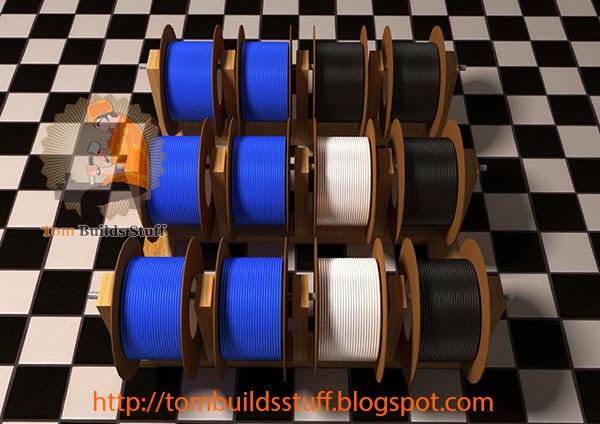
A lot of cabling comes with sequential length markers on the jacket to help you pull out the correct length of cable. As you begin to pull out the cable from the pull box (or spool) and wind it on your own spools, use a marker to write the starting length of the cable on the side of the spool to help you figure out how much is left in the future. Also mark the type of cable on the spool to make it easier to read.Let's say you plan to run 3 data, 1 voice and 2 coaxial cables to each wall plate in your home and your longest run is going to be 100'. You buy 2 boxes of data cable, 1 box of phone cable and 1 spool of coax cable. Respool your cable onto your own spools evenly distributing them so you have 3 spools of data cable on your rack. You can leave the voice cable in the pull box and the coax on the spool it came with since you'll only be pulling one of each at a time.
When it's time to pull cable to a wall plate from your distribution panel, create a bundle by pulling one cable from each spool. That way each wall plate requires only one pull.
It will take some time to respool your cable but it will make pulling cable go a lot faster than trying to cut each length for each pull. It also reduces that chances that you'll make a mistake and waste cable.
When you're done pulling cable you can mount the whole rack on the wall of your basement or garage and use it as a cable organizer.


0 comments :
Post a Comment