
Some helpful tips on how to organize cables around your computer desk, entertainment system and other parts of your home.
Sadly, that's an actual picture of what's lurking under my desk. What's even sadder is that's just one small portion of the mess and it repeats itself in other parts of my home. (I won't mention the peanut I had to crop out so you don't think I'm a complete slob!)
I need a lot of different peripherals and even though I have good WiFi equipment as more people in the area use WiFi it's difficult to maintain speeds good enough to stream full HD video to other computers and TVs. I've bought new access points, built antenna boosters and still have to scan and switch channels from time to time. Wired ain't tired! (fake TM)
It's one of the big reasons I'm trying to plan a structured home wiring project. It would get a lot of the cables I have by my computer, and other areas, moved to a central location.
Probably the worst part of the photo is all the dust and pet hair. It's dark down there so I normally can't even tell. I try and vacuum but it's just so hard with that mess. There is definitely no 5-second rule if I drop a snack while at the computer! Partly because it just disappears into the void.
When I have to replace a cord, upgrade a device or try to plug something new in it takes me more time than it should. Over the years I've tried improving my cable management by using different things I had laying around but now it's time to do things right and this is how I'm going about it.

Label Printer
I was never winning any awards for handwriting and I think the last time I actually had to write more than a few quick notes by was before the DotCom bubble. My chicken scratch is hard to read on a cable tucked in the back of a computer underneath a desk.I chose the PT-H100 because it was the cheapest label maker I found that had a feature specifically for labeling cords. Looks like it was also on sale. It can print cable flags. Instead of trying to wrap the label vertically around the cable (which always comes lose) it prints the label twice then you fold the label over on itself over the cord like a little flag. Adhesive to adhesive contact forms a better bond than adhesive to dirty dusty cable. Just like with contact cement.

If you don't like the flags and prefer to have the label wrap around the length of the cord you need self laminating wire labels. They're the types of wire markers I've seen used in every data center or server room I've been in. You can buy them in sheets for use with laser or inkjet printers. They're pretty expensive and most places sell them in packs of 1,000 but I've found some places like Mouser which sell individual sheets of 32 labels.
If you have better penmanship than me this Wire Label Dispenser uses self laminating wire markers that you can write on by hand.
They make label makers with better features for cables which are aimed at telecom workers, electricians and other professionals. They make it easy to print labels for not only cords but patch panels and other network hardware as well as being able to print on more durable materials such as heat shrink tubing. Brother makes the PT-7600
Tips For Labeling Cables
- Unless you have one of the more expensive label makers that use the self laminating wire labels, use the cable flag type label. You can also try wrapping the label with some clear shipping tape to help it stay on longer and possibly clean the cable with some alcohol first.
- Use the smallest fond you can read so the labels aren't huge and don't forget you can print on 2 lines to save space. You only need to know what the cable is the few times you need to do something with it. You're not doing an inventory check of cables every time you sit at your computer.
- It's good to label cables on both ends but not necessary to label every cable. For instance you likely only have one monitor cable. It's obvious what it looks like and where it goes.
- Don't place the label all the way up to the connector. Leave it back a few inches where it's easier to see. If you're constantly pulling cables out of the back of your computer it doesn't help you much if the label is tucked away out of sight.
- Try to keep labels out of regular sight for things you don't use daily. It's fun to label but you don't want to create label clutter. Find a happy medium between hidden and convenient.
- Fold the flag in half at the dotted line to make it easier to center the label on the cord before you remove the label backing.
- Even when the margin is set to narrow there is still quite a big margin on the outside of the Cable Flags. Don't cut this off until after you apply the label to the cable. That way you handle the part of the label you'll be trimming off. Oils and cheese doodle dust from your fingers won't weaken the adhesive that way.
General Tips For The PT-H100
- Set the margin to Narrow to waste less label.
- If you're printing multiple labels use the Chain Print option to avoid that little extra wasted tape on the front of each label even when using Narrow margins.
- Don't touch the cutter when printing or you'll get an error and the printer will abort printing.
- Clean the surface you're applying the label to with alcohol (or other suitable cleaner that doesn't leave behind residue) and let evaporate. Press the label down firmly to get good adhesion.
- Remove the batteries in between uses because some people have reported that it drains batteries even when not in use. It takes 6 AAA batteries.
- It doesn't feel like the sturdiest thing in the world so try not to drop or mishandle it.
- Order a 2 Pack of Tape from Amazon
. The tape you get with the label maker is only half the length of a retail tape. When you're playing around with it for the first time, learning, making mistakes, it goes by fast. In the middle of my project I ran out of tape and had to go to the local office supply store. Wound up paying almost double what I would have if I bought it on line.
Use At Least Two Power Strips
A lot of electronics use power even when they're off. I like to split the different components between at least two power strips. One for my computer, monitor, speakers, phone and networking equipment. The other for less frequently used things like printers, scanners, chargers, etc. When I'm not using something on that power strip I keep the whole strip turned off. I mounted it so that it's out of the way but still convenient to switch on and off and change plugs.The other power strip stays on all the time for the networking hardware but I'm hoping to move that all down to the basement at some point.
I use a APC BE550G Back-UPS ES
Keep Devices Off The Floor
Though a neatly coiled group of cables laying on the floor is better than a mess of cables it's still hard to vacuum around it. Try to get as much stuff off the floor as possible.Mount Power Strips and More To Walls and Desk With Screws

When they're new some come with a template to help you mark the location of screws but it's easy enough to make your own template. Just flip the device upside down, place flat head screws in the keyhole slots, push a piece of paper down over the screws and use that as your template.
Now you can place the paper where you want to mount the device and know exactly where to put the screws.
Use Command Strips For Smaller Items
My computer case isn't directly underneath my keyboard and monitor. It's off to the side. Too far away for the cords to reach while routing the cables to hide them. Instead I have this 4 port USB hub connected with a USB extension cable. It's mounted in the kneehole area of my desk under my monitor. I used one of the 3M Command Strips on the back of it so I can easily remove it later.
I was using the small Command Strips that came with the small hooks I purchased but if you don't have them or you want to support heavier items you can get an assortment of Command Strips without hooks
Command Strips are also good for keeping things down on top of the desk. I have this small card reader that's very light and doesn't stay put. Every time I need to use it I have to fish it out from between the desk and wall because it always falls down. One command strip and now I know where it's going to be.
Strap Cables Up Off The Floor
Monitor, mouse, keyboard, speakers, scanners, printers, network cables and assorted odds and ends leads to a lot of cables all around. I guess I could get a wireless keyboard and mouse or how about a WiFi printer? It might get costly though as I need to keep replacing keyboards and mice after they get smashed up against the wall when the batteries die in the middle of something important but on the plus side I might not need to read what I print since the data has already passed through my brain via electromagnetic radiation! :)It just takes a little time to route cables so they're out of the way and off the floor.
Desk Grommets

It only takes a few seconds with a drill and a hole saw big. Just remember. Mark the location from the top, check the underside for potential obstructions. Place the mandrel on the mark and hold the drill straight. When the mandrel (the bit in the center) starts to poke out from the other side, stop the drill and finish the whole up from the other side.
I've always had to add something like a thick rubber band around the desk grommet to get a more secure fit in the hole.

Tape Pennies To Keyboard And Mouse Cords To Make Them Self Retracting
Sometimes I like to recline in my office chair with my feet on the desk and keyboard on my lap. When I move the keyboard back on the desk a long length of cable slops all over the desktop.What's worse is the cables fold under the keyboard and mouse. They don't seem to make keyboard and mice cables thick like they used to and there's little or no strain relief so every year or two I need to replace either my keyboard or mouse because that part of the cord gets damaged from all the bending.
Pennies to the Rescue! I grabbed 32 pennies and used shipping tape to weigh the cords down. 16 on the keyboard and 16 on the mouse cord. I let the cords hang naturally when the keyboard is set for my normal sitting position (because this is when they're closest to the desk grommet) and taped the weight a couple inches above the bend on the device side of the cord.


Now when I take my keyboard off my lap and put it back on the desk the weight of the pennies pulls the cord back down into the hole and out of the desk.

16 pennies is 1.5 ounces (in case you fish and have bullet weights) which is perfect for the keyboard. The mouse could probably be a couple pennies lighter.
Velcro, Wire Tie Mounts and Command Hooks
Plastic cable ties are frequently used to wrap bundles of cable together but they're not the best choice. Just the force of them can damage cables but when it's time to remove them (moving things around, adding more equipment) you can accidentally cut cables when you're cutting off the cable tie. Instead Velcro is preferred. I have this 3/4" Roll of Velcro Cable TieThe 3/4" width is normally used for bundling together large amounts of cables not the 4-6 that I was dealing with so after cutting them to the length I needed, I cut them into strips to get more use out of the roll. Thinner strips also allowed me to pass the Velcro cable tie through these self adhesive cable tie mounts

The adhesive is supposedly fairly easy to remove but to be safe I stuck them in areas that won't matter if they cause damage when removed. Underside of desk, inside the knee hole, etc.
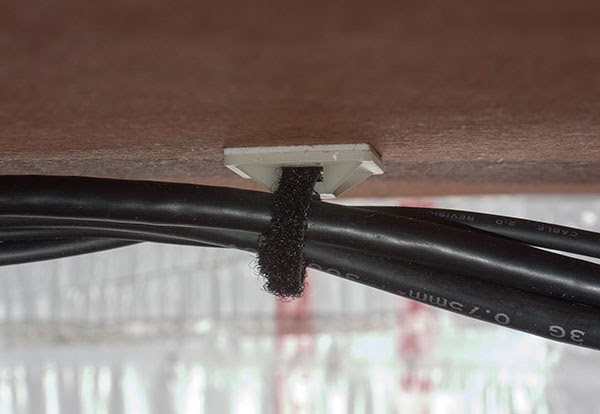
In areas where I was more concerned about damage I decided to use small 3M Command strips instead. I bundled a small cable tie along with the cables and wrapped it with Velcro. I used the cable tie as a ring to easily hang it on a Command hook. This keeps the cables off the floor but I can also get a bit of extra length without unbundling the cables if I need to pull my computer chassis out.

All this took up about half a Saturday with a lot of procrastination and other chores thrown in.
Comments
Join the Discussion