


Disclosure: This post may contain affiliate links. As an Amazon Associate I earn from qualifying purchases. DIY work involves risk. Verify dimensions, follow local codes, and use proper safety equipment.

Free woodworking plans to build an open front workbench out of 2x4's and plywood.
I have a small garage that is used for storage as well as working on projects. There's not a lot of room once my car is in so I try to be very aggressive with saving space. I also need to store things under it that roll or are very heavy so I didn'tt want to have low shelves that required picking things up.
The result is the Open Front Garage Workbench and in this post you'll find instructions on how to build your own.
The workbench is 8' wide, 25" deep and 36" high. It's constructed from 2x4's and can be cut with only a circular saw but a miter saw would be easier. The center section, which is an important part of the stability for this open design, is also large enough to hold many wet/dry vacs.
What You'll Need
Materials
- (1) 4' x 8' 3/4" sheet of sanded plywood
- (15) 8' 2x4 wood studs
- (2) 2x4 12 gauge galvanized L-angle brackets
- (2) boxes of 25 3/8" x 3" lag screws
- (2) boxes of 25 3/8" flat washers
- (1) 125 count box of 2-1/2" Kreg blue coated screws
- (1) box of 100 #8 1-1/2" zinc plated flat head wood screws for top and shelf
- (8) #8 2-1/4" wood screws for attaching center shelf supports to side.
Tools
- Can be cut with circular saw but also having a miter saw will make things easier.
- Drill
- pilot drill/countersink set like the Dewalt DW2535
- 9/32" drill bit for lag bolt pilot holes
- Kreg pocket hole jig. (See my post on which Kreg Pocket hole jig to buy)
- tape measure
- pencil
- clamps
Cut List
Plywood
- (1) 96" x 25" 1/2" Plywood Top
- (2) 26" x 21" 1/2" Plywood Shelf
Boards
- (3) 96" 2x4 Rails
- (8) 35-1/4" 2x4 Legs
- (8) 14" 2x4 Leg Rail
- (8) 20" 2x4 Leg Braces (before miter)
- (2) 19-1/2" 2x4 Center Shelf Sides
- (1) 26" 2x4 Center Shelf Front
- (16) 12" 2x4 Corner Braces
- (3) 21" 2x4 Top Supports
- (2) 35" 2x4 Back Brace A
- (2) 31-1/2" 2x4 Back Brace B
- (4) 16" 2x4 Back Brace C
Cut Plan
Plywood

2x4's

Step 1
Start by assembling the main parts of each leg assembly. There will be 4 legs total.
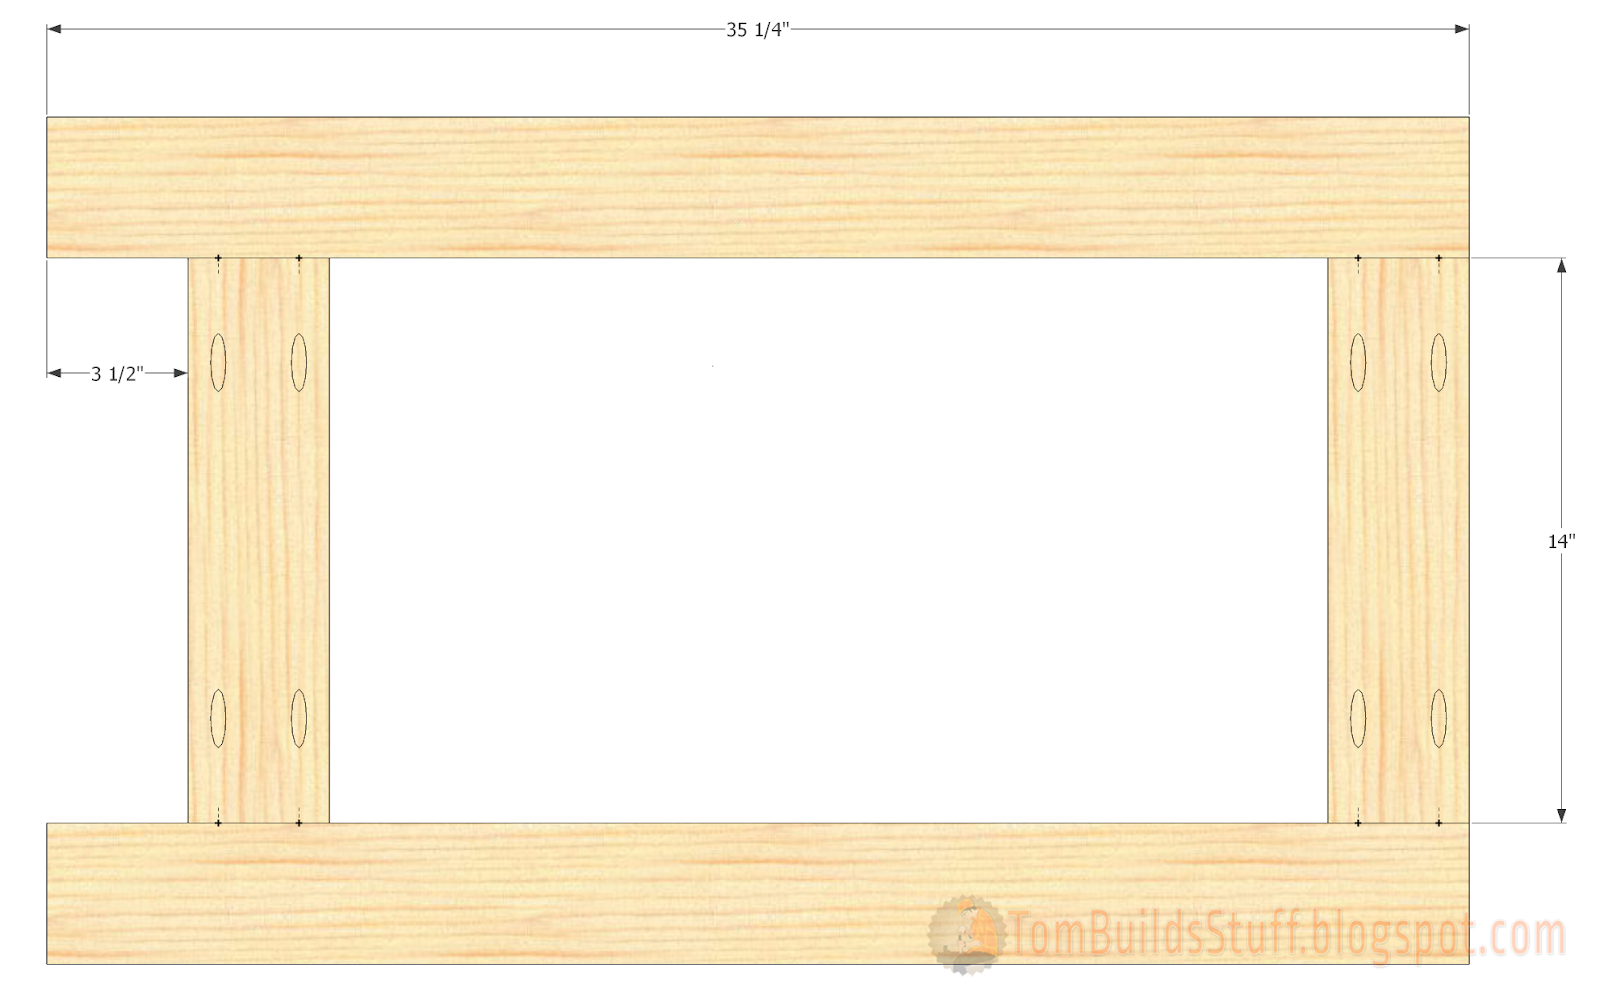
Each leg consists of 2 35-1/4" upright members and 2 14" horizontal 2x4 members. Use wood glue and pocket screw joinery to assembly the legs. You can use a scrap 2x4 on the bottom as a spacer for the toekick space.
Assemble all 4 legs to this point.
Assemble all 4 legs to this point.
Step 2
Now we'll add the diagonal bracing to the interior leg opening. You'll want to custom cut the first one and then repeat the cuts for all the other ones so you get a good fit.
Start by making 8 20" long 2x4 boards then for each board, on one corner, make a 50 degree miter as close to the corner as you can.

Now take one of the boards and place it in the miter in the corner as shown in the next image and mark where the next miter needs to go. Make your next miter at 40 degrees just a little longer than your mark. Slowly creep up to the right length by taking off a small bit at a time until it fits. Final long length of the board should be about 18-1/4" Once you found the right length check to see if it fits all your leg assemblies and use that board as a reference to cut the remaining boards by using it to place a stop or something along those lines.

Next glue and screw the diagonal 2x4 members as shown in each leg assembly.
When adding pocket screw holes on mitered boards, part of the pocket hole will be off the board. That's fine. As long as the flat part where the screw head rests is in the wood the pocket hole will function normally. Just be carefully to clamp the pocket hole jig and board very tight. That's standard advice but especially important in this case. I generally use 2 clamps and make sure my hand is clear in case the jig comes loose and the drill slips.
When adding pocket screw holes on mitered boards, part of the pocket hole will be off the board. That's fine. As long as the flat part where the screw head rests is in the wood the pocket hole will function normally. Just be carefully to clamp the pocket hole jig and board very tight. That's standard advice but especially important in this case. I generally use 2 clamps and make sure my hand is clear in case the jig comes loose and the drill slips.
Step 3
Next we start to assembly the center section as it will provide us with support when assembling the rest of the workbench.

Drill all the pocket holes first as shown.
It doesn't really matter but my preference is to have the pocket holes on these legs facing out.
The supports that connect the legs to give them rigidity and also serve as a support for the shelf are connected to each other using pocket screws as shown with the two side pieces butting up to and screwing into the front piece. Next attach the "U" to the legs at the same level as the bottom rail. Use the pocket holes in the front piece to attach it as well as some 2-1/2" wood screws for the side pieces. Use glue for all the joints.
Step 4
Now we'll attach 2 of the corner braces.

Use the plywood shelf to help keep everything square. Don't screw it down but just place it as a spacer. Glue and screw the 12" long diagonal braces using pocket screws as shown.
Step 5
Now we'll attach the back railes to the center legs.

Place the center legs face down on the floor and place 2 8' long 2x4's over them as shown. The legs should be 33-1/2" in from each side. If you can clamp the boards in place do so then do all the lag screws at the same time. If you can't clamp it down till the next step carefully drill pilot holes, use washers and screw in the lag screws to connect the boards to the legs as shown. Make sure they're placed correctly and straight.
Step 6
The legs on the end go on next.

My preference for these end legs is to have the pocket holes facing in but it doesn't really matter.
Attach each leg to the ends of the boards using pilot holes, use washers and lag screws, making sure they're straight and line up with the other legs.
Step 7
The back bracing goes on next. I wanted each leg to be connected to 4 different members so it's a little complex but I think it looks pretty cool. Don't worry it's not as hard to do as it looks. Plus if you're staring at this design, I mean really long like hours and hours over the course of days, you start to notice you can actually trace out different letters in the design. Not all the letters but enough letters that you can spell out TOM and even BUILDS and STUFF which is pretty neat if you're name is Tom and you like to build stuff. :)
I made a similar workbench without as much bracing and it's been holding up fine with a lot of weight on it but with lateral support unavailable at the front-base of the two ends, I didn't want to skimp where I didn't have to.
I made a similar workbench without as much bracing and it's been holding up fine with a lot of weight on it but with lateral support unavailable at the front-base of the two ends, I didn't want to skimp where I didn't have to.

Where the member attaches to a leg, glue, drill pilot holes and use washers and lag screws.
Where the member attaches to one of the horizontal boards or another brace, glue and use pocket hole screws.
Start with the two 35" braces that go from the top corner down on each side. Placement isn't critical as long as the outside edge is flush with the leg.
Next do the 31-1/2" members. The top edge is mitered at 45 degrees and the bottom part that attaches to the 35" bracing is 90 degrees.
The two 16" members that attach to the bottom of the center legs have a 45 degree cut on one side and a 90 degree cut on the other. Use glue and pocket screws to attach them to the other 2x4's then use glue, washers and anchor screws to attach to the center legs.
The last 2 braces go in the bottom corner and are also 16" but almost 3" of the mitered end is trimmed off to make it flush with the end of the leg so there's enough room to put 2 lag screws. No need to really measure the amount to cut off. Just put it in place and mark the extra with a pencil. Cut it at 45 degrees on the miter saw.
Before we life up the workbench and set it upright but in those last 2 corner braces under the center section.
Step 8
Attaching the front rail.

Using glue, pilot holes, washers and lag screws attach the front rail to the top of the legs so it sits flush as shown.
Step 9
Some more bracing up top.

Top top helps keep the top of the legs stable so there's more bracing up top. I also like extra structure under the plywood top for a very strong work surface.
The corner braces are 12" long with 45 degree miters on each end. Glue and pocket screws hold them in place to the legs and top rails.
The straight top supports are 21" long and are also attached with glue and pocket hole screws.
Use the angle brackets on the lower parts of the legs to attach to the back as shown in each back corner.
Step 10
The final step is to attach the top and shelf.

For all the screws, screw from the top down. First make a pilot hole and countersink bit to make a hole and countersink. Then drive in the wood screws into the tops of the horizontal rails and legs about every 8" around the perimeter as well as down along the tops of the legs.
Your new workbench is ready. Keep an eye out for the next set of plans of rolling cabinets that will fit under the workbench.


super plan Mercie
ReplyDeleteThis is just what I have been looking for in a workbench, thank you.
ReplyDelete