Disclosure: This post may contain affiliate links; if you buy through them, we may earn a commission at no extra cost to you.
As an Amazon Associate I earn from qualifying purchases.
Safety & accuracy: DIY work involves risks. Use proper PPE and follow local codes and tool manuals. Plans/measurements can vary, verify all dimensions and materials before cutting or wiring.
Free woodworking plans to build a freestanding or walk-in closet organizer.Safety & accuracy: DIY work involves risks. Use proper PPE and follow local codes and tool manuals. Plans/measurements can vary, verify all dimensions and materials before cutting or wiring.
About the Freestanding Closet Organizer
There are a lot of situations where you need additional closet space in a room. Older homes don't have large closets and some bedrooms may not have any closets at all if you're converting a den or study into a bedroom. This freestanding closet organizer provides ample room for hanging clothing, shelf space as well as 2 large drawers. It only needs 3 full sheets of 3/4" plywood and partial sheets of 1/2" and 1/4" to construct making it very affordable for the amount of storage you get.Four of these Amazon Basics Fabric Storage Bins fit nicely on the top.
You can choose the plywood veneer and finishing option that best fits your decor.
Dimensions
When fully assembled the freestanding closet will be 74-1/4" wide by 23-15/16" deep by 85" high. If you'd like to make it narrower you can cut the shelves smaller.What You'll Need
Materials
- (3) 3/4” 4'x8' Plywood
- (1) 1/2” 4'x4' Plywood
- (1) 1/4” 2'x4' Plywood
- (3) 7/8 in. x 25 ft. Veneer Edgebanding
- (1) Kreg SML-C125-100 1-1/4-Inch Coarse Washer-Head Pocket Screws
- (1) Kreg SML-C1-100 1-Inch Coarse Pocket Screws
- (1) 96” Oval Closet Rod
- (4) Oval Closet Rod Flanges (they come in pairs)
- (2) 20” Soft Closet Full Extension Drawer Slides
- (2) Drawer Pulls
- (4) Fabric Storage Bins
- Finishing supplies
Tools
- Circular saw and guide or table saw to cut plywood
- Drill/Driver and bits
- Hacksaw
- Kreg Pocket Hole Jig
- Iron
- Utility knife or edgebanding trimmer
- Level
- Tape measure, pencil, straight edge
Cut List
- (4) 85” 23-15/16” 3/4” Plywood Sides
- (7) 23-3/4” 23-3/16” 3/4” Plywood Shelf
- (8) 4-1/2” 23-3/4” 3/4” Plywood Stretcher
- (2) 3-1/2” 23-3/4” 3/4” Plywood Toe Kick
- (2) 10-7/8” 23-5/8” 3/4” Plywood Drawer Front
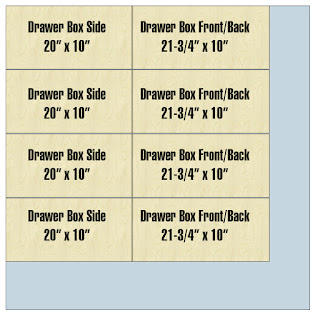
- (4) 20” 10” 1/2” Plywood Drawer Box Side
- (4) 21-3/4” 10” 1/2” Plywood Drawer Box F/B
- (2) 22-1/4” 19” 1/4” Plywood Drawer Bottom
Cut Plan
3/4" Plywood
1/2" Plywood
1/4" Plywood
Step 1
Start by drilling all the pocket holes in the shelf, stretcher and toe kick plywood pieces as shown.
Step 2
Use wood glue and 1-1/4" Kreg pocket screws to attach the shelves to the stretchers. There will be 1 left over stretcher so don't worry. 2 of the shelves should have the pocket holes facing up while the others have the pocket holes facing down as shown.
Step 3
Apply edgebanding to the fronts of the shelves, fronts of sides, drawer fronts.
Step 4
Attach the shelves and toe kick to 2 of the side pieces to form the first freestanding closet cabinet using wood glue and 1-1/4" Kreg screws
Step 5
Attach the shelves to the 2 remaining side pieces to form the other fresstanding closet cabinet using wood glue and 1-1/4" Kreg screws.
Step 6
Build the 2 drawer boxes for the closet system as shown using wood glue and 1" Kreg Pocket Screws. For detailed instructions please read my post on how to build drawer boxes.
Step 7
Mount the drawer boxes into the closet frame using the drawer glides.
Step 8
Attach the drawer fronts to the drawer boxes. There should be a 1/16" gap. I start by removing the bottom drawer box from the cabinet. I'll place the drawer front on the drawer box and position it where it looks good. You can use shims but eyeballing it is usually good enough. Then I'll pull out the drawerbox while pressing the front tight against the drawer box so it doesn't move as I pull it out. Now I can reach in and screw it in place temporarily using 1" screws. Then I'll drill holes for the drawer pulls and attach them.
Step 9
Notch out the back to fit around your baseboards. If your baseboards are taller than 3-1/2" you may need to make the toe kick higher.
Step 10
To finish things off place one of the cabinets on the wall where you want your freestanding closet system. Shim it so it's level and screw it through the stretchers into the wall framing to secure it.
Attach the middle shelves to the first cabinet using glue 1-1/4" pocket screws making sure everything is level and screw into the wall framing through the stretchers as well.
Place and attach the last cabinet attaching it to the middle shelves using pocket screws and glue. Use screws to attach the cabinet to the wall using screws into the wall framing.
Finally install the closet rod hardware so it's 2" down from the top shelf.


LOVE!!!! Thank you.
ReplyDeleteThank you!
ReplyDeletegreat blog
ReplyDelete