


Disclosure: This post may contain affiliate links; if you buy through them, we may earn a commission at no extra cost to you.
As an Amazon Associate I earn from qualifying purchases.
Safety & accuracy: DIY work involves risks. Use proper PPE and follow local codes and tool manuals. Plans/measurements can vary, verify all dimensions and materials before cutting or wiring.
Safety & accuracy: DIY work involves risks. Use proper PPE and follow local codes and tool manuals. Plans/measurements can vary, verify all dimensions and materials before cutting or wiring.

Free woodworking plans for an open frame or enclosed 20U Server Rack for home or small office.

Every so often I look into purchasing a rack to put them in but even used they're not cheap. A new half height, no frills open rack cabinet (like this Tripp Lite SR4POST25 25U 4-Post Open Frame Rack Cabinet
Out of curiosity I wanted to see what it would take to build my own so I designed and priced out a 20U server rack. 20U is more than most people will need for a home server rack but I chose that height because it puts the top at a comfortable position as a standing desk. You can place a monitor, keyboard and mouse hooked up to a KVM switch to have direct console access.
Pricing wasn't too bad. Materials for an enclosed 20U server rack came out to just under $400. For an open rack it was only about $100 including casters. Much cheaper than buying a server enclosure. Here's what I came up with if anyone is interested.
If you'd like to help support the site you can purchase a printable PDF of this article for only $4.95.

The design of the enclosed cabinet is based on the open server rack so you can use this as a guide to build an open rack if that's all you want.
What You'll Need
Materials
- 2 Pairs of 20U EIA 19" Rack Rails (can be found on eBay
and on Amazon
)
- 5 8' 2x4 studs
- 4 6' 1x4 boards that match plywood (poplar)
- 1 4'x8' sheet of 3/4" plywood (birch)
- 25' of plywood edge banding
- 4 8' lengths of door stop moulding
- 1 17' package of D shaped weather strip
- 2 Pairs Heavy-Duty 5 in. Swivel Casters
- 1 roll of aluminum window screen
- Hardware cloth
- 1 roll of filter foam
- 2 pairs of Blum Soft-Close 110 deg BLUMotion Clip Top Inset Hinges
- 2 L Handle Cam Locks
- 4 2U Blank Rack Panels
- Finishing materials (paint or stain/finish, wood filler, etc)
- Wood Glue
- Kreg pocket screws for 1-1/2" and 3/4" material
Tools
- Drill
- Circular saw and guide or table saw for cutting plywood
- Miterbox or power miter saw for making square cuts in boards
- Kreg Pocket Hole Jig
- Square
- Pilot hole bits
- Clamps
- Tape measure
- pencil
- Finishing tools
Preface
These plans can be customized to suit your needs. Instead of coming up with a cut list and cut plans I'm writing these steps in a way that should make it easy for you to build the rack to your specifications by measuring and marking as you go.You can save a lot of time by prefinishing the wood before putting everything together.
Step 1: Attach Rack Rails to Side Supports
Measure and cut 4 pieces of 2x4 to the exact height of your rack rails. Drill pilot holes and screw them to the side of the stud as shown.
The rails will have holes on each side of the angle. The side that has the variations will be where the equipment gets mounted. The side with the more standard spacing screws into the stud. Space screws ever 2-3" with 1" wood screws. A typical 1U server weights about 10-15lbs. You probably won't fill the whole rack with servers but it's still a good idea to make sure the rails are securely attached.
Step 2: Attach Horizontal Width Boards
According to the specs, the rails should be mounted 19 1/8" apart. This might vary if you're using different types of rails. An easy way to get the exact spacing you need is to install a 2U blank to the top and bottom so you can know the exact spacing you need.Make sure the 2 sides are square. Might be a good idea to make sure some of your rack mount equipment fits too just in case the blanks are off. Once you have everything adjusted and square. Mark the length for the top and bottom 2x4 pieces. Cut to size and secure with wood glue and pocket hole screws for 1-1/2" material as shown.

You should have 2 of these rail frames. One for the front and one for the back.
Step 4: Attach Boards For Rack Server Depth
There is no standard rack mounting depth (distance from front of front rail to back of back rail) and racks can be anywhere from 19" to 30". Different manufacturers use different rack mounting depth.- Dell 28 7/8"
- HP 29 1/8"
- IBM 28 1/2"
- Sun up to 32" (if I remember correctly)
Once you've determined the depth of your cabinet, calculate the desired rack depth, subtract the width of 2 2x4's (7") and cut 4 lengths of 2x4 for the verticals. Secure with wood glue and pocket hole joints as shown.

Step 5: Cut and Attach Additional Support Boards
For additional strength, mark and cut, then glue and screw additional 2x4 boards to the sides, top and bottom as shown.
Depending how much you plan to load up the rack you may also want to consider adding additional support such as metal L brackets at corners.
Step 6: Completed Open Rack
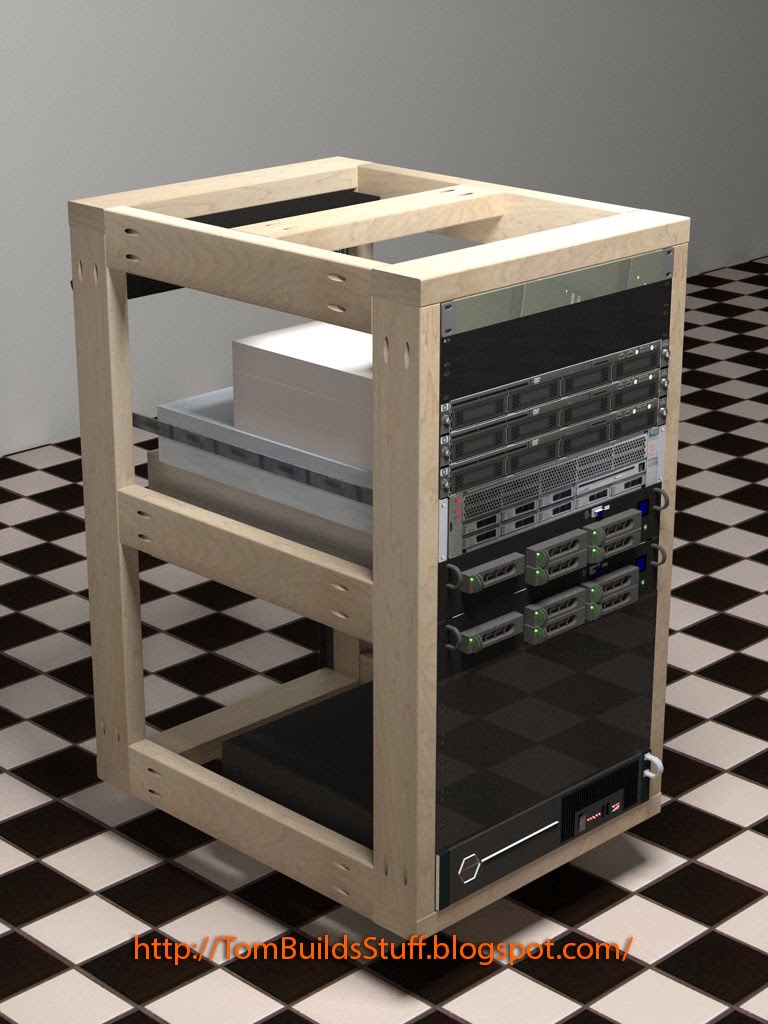
Just securely screw the casters to the bottom of the server rack frame you just built and you're good to go.
Place the rack where you'd like and start adding your servers.
An enclosed rack however does have some benefits such as the ability to keep dust and other debris out. Things like bugs. For some reason house centipedes seem to love electricity. I've found them in computer cases as well as electrical panels.
Dust can build up on the internal components of your servers making cooling less effective. We'll go with that reason instead of being creeped out about having to vacuum up dead bugs. :)
Step 7: Cut Cabinet Panels
Measure and cut the top and bottom for the server rack enclosure. The sides will be flush with the width of the open rack. The front and back overhangs 5" so add 10" to the depth of your open rack.
Measure and cut the sides as well. The depth of the sides will be the same as the depth of the top and bottom. The height of the sides will be the height of the open rack plus 2x the thickness of your plywood.
Don't secure anything yet. Just get it ready. Apply edgebanding to the front and back of the top and bottom and to the top, front and back of the sides.
Step 8: Attach Cabinet Top and Sides
Drill the appropriate pocket holes for 3/4" material into the underside of the cabinet top spacing the holes every 6-8". Attach the sides to the top as shown.
Now place the upside down open frame rack in the partial cabinet centering it. There should be 5" of plywood overhanging the front and back. Secure the plywood top and sides to the 2x4 frame from the outside using 1-1/2" flat top wood screws. Drill pilot holes and countersinks deep enough to fill the holes with wood filler before finishing. You may want to measure and mark the locations of the screws for a more uniform look.

Step 9: Attach Cabinet Bottom
Drill holes for pocket screws on the underside of the cabinet bottom spacing them every 6" and attach the bottom to the cabinet sides. Also drill and countersink 1-1/2" wood screws into the 2x4's.
Step 10: Attach Casters
With the server rack cabinet already upside down it's a good time to install the casters. Position the casters so that they are over 2x4's, drill pilot holes and secure them with 1-1/2" to 2" wood screws.Optional: Insulation
At this point you might want to consider adding some 1" or 1-1/2" foil backed rigid insulation to the spaces between the 2x4's in the open rack (not in the 5" in front or behind it). Rack servers are loud (especially 1U servers) and it may help muffle some of the fan noise. Not much since the front and back will be open. If you plan on keeping this where noise is an issue consider larger form factor servers that can accommodate 80mm or 120mm fans which don't make as much noise.Step 11: Build Door Frames
Measure the front and back openings and subtract 1/4" from the width and height. This will give you the right size for the width and height of your door with a 1/8" gap all the way around.Cut the 1x4 boards to the appropriate length, drill pocket holes, glue and screw together as shown after making sure everything is the right size in the opening.

Step 12: Attach Screen
Good ventilation is important so the center of the door will be aluminum window screen. Stretch and staple the aluminum screen on the inside of each door and trim away the excess.
For a more finished look you can cut and screw some screen molding around the edges of the screen.
Step 12: Add Filter Foam To Front Door
Dust can be a real problem for computers so we're going to add a removable foam filter to the front door to help catch some of the dust. A filter isn't necessary on the back door because air flows from front to back through servers.Cut the foam filter material so it's larger than the aluminum screen already installed on the door. Cut a piece of hardware cloth about 1/2"- 1" wider and longer than the piece of filter foam.
Lay the filter foam on the back of the door over the aluminum screen. Lay the hardware cloth over the filter foam and screw the hardware cloth into the door around the edges using 3/8" or 1/2" small wood screws.
The hardware cloth will keep the filter foam from sagging or otherwise losing it's shape. When the filter gets full of dust simply unscrew the hardware cloth then rinse and dry the filter foam then reinstall.
Step 13: Attach Doors To Cabinet
Follow the instructions for the hinges to attach the doors the cabinet. Be mindful of which way you want them to swing out and make sure you have an even 1/8" gap between the door and the cabinet.The doors are inset meaning the front of the door is flush with the front of the cabinet.
After adjusting the hinges install the door handles.

Step 14: Door Stops and Weather Strip
To prevent dust (and nasty house centipedes) from entering the cabinet through the gap around the door, door stop molding gets installed 7/8" back from the opening. It will need to be cut to accommodate the hinges and door latch hardware.On the front of the door stop molding (the side that faces the door) apply the self-adhesive D-shaped weather strip.
Do this for both doors.

Other Thoughts
Here are some other thoughts on accessories and equipment that can make your home server rack a little better.KVM Switch
KVM stands for Keyboard, Video and Mouse. Most of the time you'll be connecting to the servers remotely but from time to time you may need to access them directly. A KVM switch allows you to hook up one monitor, keyboard and mouse to multiple computers. A rack mount KVM switch like the TRENDnet 8-Port TK-803RMount the KVM switch in the first rack space in the front of the cabinet. You can place a regular monitor, keyboard and mouse on top of the cabinet. Drill a hole in the top of the cabinet just behind the back of the rack mounted KVM switch and use a brush grommet to pass cables to the KVM while keeping dirt and dust out.
Power
It would be best if you can keep this on it's own circuit. A dedicated 20 Amp circuit if you plan on using a lot of hardware.You can mount a 1U power strip on the back of the rack cabinet for your PDU (power distribution unit). Something like the this Trip-Lite RS1215-RA but a better option would be to have a rack mount UPS (uninterruptable power supply) like this Cyberpower CPS1500AVR mounted to the front of the rack cabinet. A UPS provides temporary power for short periods of power loss and also helps make sure the power coming in is clean. Much better than a surge suppressor.
Networking
Get a rack mount network switch and mount it to the back of the rack mount cabinet to attach your servers to. That way you only have to worry about one network cable coming into the rack cabinet.Cable Management
Underneath your switch mount a 1U Horizontal D-Ring cable organizer to help keep the network cables neat. Also mount some D-Rings on the sides of the cabinet in the back (between the rails and the door) to channel network and power cables through to keep them out of the way.Drill a hole on one of the sides and use a grommet to be able to run the power cable for the UPS/PDU and network cable to the switch.
Blank Panels
Fill up any unused space with blank panels. This improves airflow. Probably not as important when not in a properly set up server room but they do help.Reader Submitted Photos
Thomas Kangas built a slightly modified version of this open server rack using these plans. It came out pretty nice.


I can't figure out who built the enclosed version shown below but I found them on Imgur and he said he used my plans. Came out pretty nice whoever you are.

Here's one more from Imgur. Just the frame without cabinet and shorter.

Chris used my plans to build an enclosed server cabinet and added some Roxul insulation for soundproofing and added fans on the top for cooling. He got a decent amount of noise reduced.


Nice pics sent by Derf that include a plexiglass door glass with fans.


Hey Tom, what do you model with ?
ReplyDeleteIf I can Build a 9U rack for under 200.00 then its a good deal.
DeleteIf you are using this more for networking equipment and maybe some storage devices, would using 2x3's suffice?
ReplyDeleteBill studs these days aren't as strong as they used to be storage devices can be quite heavy if they have a lot of drives. I'd try to stick with 2x4's but 2x3's might work as long as you keep the heavy stuff at the bottom and make sure all the joints are well fastened. Maybe use some metal brackets in addition to wood glue and pocket holes just to be safe.
DeleteI did use 4x6 and did not regret it.
DeleteEven though the whole thing got heavier.
Hi, in this guide i can't understand where put the studs...
Deletewhere can i do the wholes for them?
That's what the Kreg Pocket Hole Jig is for. Failing that, you could just screw the 2x4s together at each of the long ends, two per end. Just make sure you're using strong/long enough screws.
DeleteIs it alright to use the variable sized holes to mount into the studs? The lip on that side of the mounting rails is too wide and reduces the width of the equipment I can put in the rack.
ReplyDeleteNot sure what you mean. As long as you have the rails properly spaced it shouldn't restrict the equipment you can put in. Can you use the form to contact me and send me some pictures?
DeleteI am planning to create home made rack server to save money. Glad that you shared this I can get some ideas. Keep posting!
ReplyDeleteThis is a really cool post! Thanks for this. Makes me think I might be able to implement something similar.
ReplyDeleteNice build, I am plan on building one. Thanks for the plans.
ReplyDeleteI looking for a rack shelf like pictured above (from Thomas Kangas). Where did you find yours? All I've search look nothing like that.
ReplyDeleteI looking for a rack shelf like pictured above (from Thomas Kangas). Where did you find yours? All I've search look nothing like that.
ReplyDeleteThere are a number of rack shelves you can find here http://amzn.to/1xSTauB if you want something that fills the whole space look for an adjustable one that has mounts on the front and back.
DeleteThis great, making one asap
ReplyDeleteThanks so much for putting these plans online. Typo note: you have "front" as "font" in one section.
ReplyDeleteHi there,
ReplyDeleteI quite like the plans here but am concerned about the implications of heat dissipation. Is it likely that more heat will be retained as a result of using wood, and having it enclosed on all sides?
Thanks
Rack servers draw in air from the front and blow it out the back. The rack isn't enclosed on all 4 sides. The doors on the front and back are covered with window screen material to allow for ventilation.
DeleteThanks, would there be any other considerations in terms of overheating or fire?
DeleteWould these be increased if the rear was enclosed?
Dry wood ignites at about 450 degF. The hottest part of a server will be the CPU and it would burn out long before it ever got that hot.The servers wouldn't come in direct contact with the wood.
DeleteI wouldn't enclose the back because the hot air needs to exit the cabinet so your equipment doesn't overheat. There also needs to be sufficient clearance behind the cabinet for the hot air to go somewhere and there needs to be space in front of the cabinet for the servers to draw in cool air. The room will also need to be able to handle the heat exhausted from the servers. How much heat comes out is going to depend on the equipment but you can find the BTU/hr in the specs of some servers. Cooling may be required for the room to keep the servers at a good operating temperature if the heat output is too great for the space. Basically the same considerations you'd need to take with any rack mount equipment.
Obviously this isn't meant for a high density, high performance cluster though. You wouldn't want to fill this up with 20 48 core 1U servers filled with Velociraptor drives cranking at 100% CPU utilization. This is meant more for someone who wants to rack mount their test lan setup, home networking equipment with a few servers that do light duty work as is typical in most home networks.
Thank you.
DeleteI currently have a full size rack and am looking to downsize. This page has been invaluable as have the replies, for which I appreciate.
Thank you.
Building a 20u one of these at current. Was going to try fully enclosed doors though but with four high airflow fans, two on the back, two on the front with baffles to deflect internal sound. Do you think I may still have heat issues? Only going to have a 1u server and some network gear inside.
ReplyDeleteThank you very much for your plans.
ReplyDeleteI've built a 30u version using your open frame instructions and am really pleased with the result.
Pictures are here if you're interested:
http://padcfr.com/images/Leigh/Frame1.png
http://padcfr.com/images/Leigh/Frame2.png
I'm really surprised at the strength of the wood glue & pocket hole screws. I don't even think I'm going to use angle brackets - even for a 30u.
Thanks again!
for the 30u what did you do with the rack rails, did you get a 20u and add a 10u just sitting flush with the bottom/top of the other rails
DeleteThanks for the great plans.
ReplyDeleteThe step numbers seem to be off, though. There's no Step 3 and two Step 12s.
Do the hinges have enough clearance that equipment mounted on slides will clear them?
ReplyDeleteThanks.
Kevin
Hey there. Any chance you could post the general dimensions of the rack you built?
ReplyDeleteI am going to start this build this weekend with a few modifications. My servers are in an area of the house where they can be heard from the main living space, so I would like to build in some soundproofing.
ReplyDeleteTo achieve this, I am going to insulate between the 2x4's and add in a 1/4" sheet of playwood to the interior of the cabinet, I will create two solid access panels... one on the front and one on the back.
To address ventilation, I will be installing 12x120mm fans, 6 in the front venting into the cabinet and 6 in the back exhausting from the cabinet. each set of 6 fans will have its own individual fan controller with heat sensor and will spin as fast as required to meet the set temp.
Anything you feel I missed or could improve before I get going on the project?
I am going to start this build this weekend with a few modifications. My servers are in an area of the house where they can be heard from the main living space, so I would like to build in some soundproofing.
ReplyDeleteTo achieve this, I am going to insulate between the 2x4's and add in a 1/4" sheet of playwood to the interior of the cabinet, I will create two solid access panels... one on the front and one on the back.
To address ventilation, I will be installing 12x120mm fans, 6 in the front venting into the cabinet and 6 in the back exhausting from the cabinet. each set of 6 fans will have its own individual fan controller with heat sensor and will spin as fast as required to meet the set temp.
Anything you feel I missed or could improve before I get going on the project?
One you cut holes in the cabinet for fans sound will escape. You could possibly but some sort of air chamber on either side with holes that don't line up but that would make it bigger, more complicated and still would allow a lot of sound to escape.
DeleteRack mount equipment generally don't have the quietest fans. Especially 1u servers. If I were you the first thing I would look into is some quieter fans. There are some 40mm fans available on Amazon that claim to be silent and have good reviews. http://amzn.to/1S4DukT
I agree, I have looked at a couple different designs for air chambers on the top and bottom but that would add almost an extra 2ft of height.
DeleteWhat do you think about having a vent on the front of the cabinet and locating the fans to the rear through an offset channel in he rear access door. That could be bigger and extend the length without causing much bother.
As an alternate if the fans were shielded by a quarter circle shield like the ones you find on home forced air vents that would provide a small level of redirection from sound waves would it not?
Here are the results of my build, followed your plans with some slight modifications. Thanks for the original post, it made my life about 1000% easier.
ReplyDeletehttp://imgur.com/a/uh82C
Looks nice, would you mind putting a link in your imgur post to my instructions?
DeleteI like how it looks inside with the finished panels. How does it do in terms of quieting server noise?
A couple of things I would suggest... Can you fit a thin foam weatherstrip around the front and back 2x4 frames along with a door latch to seal the doors from letting noise escape? Looks like you left a little bit of lip so maybe you're already planing on that but thought I'd mention. Also make sure the front fan is reversed so it acts as an intake, that way you get the cool isle/hot isle like a mini data center.
The AC Affinity Fans and thermostat are a nice touch. I'm a big fan of anything with lights and buttons though. :)
Yeah, you bet, I will add the link now.
DeleteI havent done noise testing yet, just finished it last night and put the gear in for the photo op.
I am planning on adding the weathstripping to help dampen the noise, I was going to use the aluminum/neoprene ones you would find on an external door. I am planning on using toggle latches on the doors to leave room on the inside in case I need to thicken the doors with insulation for improved sound dampening.
I have reversed the front fans, then are blowing in, and the rear fans are venting out. I will be doing some heat/noise testing today, ill let you know how the progress goes!
I also am planning on installing some undermount cabinet lighting to help with visibility inside the rack.
So after doing some noise testing with an android app (not the best noise dosimeter) here are the results:
ReplyDelete- Both front and rear doors open - ~63db
- Both doors close, no weather stripping - ~ 42db
- Both doors closed w\ 1/2" foam weather stripping - ~39db
Not a huge improvement with the weather stripping, this leads me to believe that most of the left over noise is coming out of the ventilation openings.
The 24db reduction achieved my goal, I am happy with the noise reduction as it stands. I live in a split level home and the enclosure is located in an open area in the first "basement". Prior to being in the enclosure you could hear the servers anywhere in the house. With the enclosure they are essentially silent unless you are on that level of the home.
I may attempt to build a shield around the inside of the ventilation openings to reduce the noise further, but i suspect it would only be an additional couple of decibels and would only do it for my own interest not expecting any significant performance improvement.
That's pretty impressive noise reduction! Don't knock that 3db with the weatherstrip every little bit counts. Do you have enough room to put some roxul on the doors? If the 1u server isn't running very cpu intensive tasks it might be worth swapping the fans with some of the ones I linked to above. CFM may be a little less but those stock 40mm fans sound like model plane engines.
DeleteI do have room to put Roxul on the doors, I will probably try it at some point. I might trim it down a little bit instead of using the full thickness.
DeleteI thought about building a frame on the door panels and putting the roxul in it and covering with more 1/4 plywood. But the noise reduction i'll get out of it wont be a huge improvement so I am less motivated to get it done.
2x4's would be overkill to frame it in, I have to go and take a peek and see what would be a more reasonable fit. Any suggestions?
3dB is about a halving of the sound level, so it's a significant difference, although our ears work on a logarithmic scale. You can barely hear that sort of difference, but it's down at domestic background noise levels. Another way of thinking about is is as the difference between one rack and two. The weatherstrip is an easy add-on.
DeleteI have enjoyed your project and am using it as a basis for my server cabinet build. When I'm done, I'll post pics.
ReplyDeleteAloha there!
ReplyDeleteI've been eyeing this build for a while and getting pretty close to making it (so my wife won't see all my stuff on display 24/7... but she's still curious if a cabinet will make it look better).
Your instructions are pretty thorough, but I'm very curious about the screws used to attach the rails to the 2x4's... they aren't listed in the materials section and the one sentence simply states "1-inch wood screws"... but what kind of wood screws/diamater did you use? Since I'm going to just give it a try with some 2x4's and a Kreg Pocket Hole Jig, I hope Lowe's will be able to help me find the right size....
Thanks for the post though! I will send pictures if it all works out!
C-Dubs
Maybe adding an air filter of some sort (thin foam) would help keep the equipment inside a bit cleaner as well as add some sound proofing!
ReplyDeleteStep 12 mentions adding filter foam to the screens. Christopher Cogswell who left some comments above yours used solid doors and added soundproofing insulation. He sent me some photos and your comment reminded me to add them to the post. He was able to cut down on the server noise by 40%.
DeleteHello,
ReplyDeleteI am planning to build this at some point. However, I am wondering how much weight this cabinet could sustain. Any rough figures that you cuold give, please? Thank you
G
Tom,
ReplyDeletehttp://imgur.com/a/27ZJb
Finished my rack using your plans. Opted for square-hole rails and a 28-7/8" depth to accommodate mixed Dell rails. Currently have 5 R200's, 2 2950's, and 1 2900. Just need to add a patch panel and Mikrotik CRS125-24G-1S-IN. Waiting on the rails for my Dell 15FP rack console to arrive.
Must say, easy build, and it's sturdy as all get-out. Plan to build another smaller one to house my pfSense router, an Alcatel switch, and UPS. Thanks Tom!
Hey, your build looks awesome.
DeleteI have a Dell R610 with Ready Rails so I could really use the square-holes opposed to the round holes.
Where did you happen to buy the square hole rack rails?
I got mine from starcase.com
DeleteThe server rails I got off eBay.
Deletehttp://www.starcase.com/Steel_and_aluminum_rack_rail_s/388.htm
DeleteI used the Q series.
Nice blog/article ... due to space contraints in my Av hub/cupboard under the stairs I haven't the room to build a 19" rack with 3" frame so am thinking of building one out of Dexion right-angle strips and using the strips as shelf rails - so should be just over 19" wide - will post a couple of images when I get it built ...
ReplyDeleteYou have the instructions in Step 1 backwards:
ReplyDelete"The rails will have holes on each side of the angle. The side that has the variations will be where the equipment gets mounted. The side with the more standard spacing screws into the stud."
Putting the rails on in this manner wont work because the rails have significantly different widths depending on which side you screw into the stud
Tom,
ReplyDeleteI really enjoyed reading your post and have decided to use your instructions as the basis for an idea I've had mulling around in my head for a while now.
I have for a while now been contemplating an NAS for my home network. I think I've decided to go the rack mount option. But more than that, I have for a while now, been searching for something that would double as a media/entertainment center. To no avail, after coming across your article I have designed something that I think will fit my bill and wanted to share it with you.
I basically took your design and stuck 3 of them side by side, essentially making 3 racks in one, to double as an entertainment center where I can place my TV on top of the cabinet, and my A/V equipment inside along with my NAS and other home networking hardware.
I have a couple screenshots of a 3d model I put together I'll go ahead and email you separately. Looking for any critique/feedback, good or bad that you (or anyone else who reads this) might have with my idea. Looking for ways to improve it as best I can before I actually build it.
Did you use the Kreg HD jig for this, or will the R3 kit works just fine?
ReplyDeleteThe bigger/fancier jigs are more convenient and nicer, but any Kreg jig will do the job.
DeleteI don't think using Roxul is a good idea. It's made of mineral wool and slag. If disturbed it constantly sheds dust/fibers. If any of the slag got into your servers, it could short things, clog airways, or act as abrasive on fan motors and other moving surfaces.
ReplyDeleteI've built out most of a cabinet based on this plan. Right now i'm putting the finishing touches on it and am pondering what to use to dampen the sound. Going between green glue & regular drywall for the interior top and sides or quietrock. It's difficult because green glue isn't commonly sold. I'm intending to use the aluminum door idea and keep it closed. I'm wondering what the sound benefit really is to using dampening on the sides only as it seems Chris did a solid front and back to remove the sound.
ReplyDeleteI am building mine too almost the same as your's but i had a ton of melamine laying around so i went with this for the panels. I will have for now one t610 and 1 t710 in it 10u already gone
ReplyDeleteThis is brilliant. Thank you for sharing. I'm going to build my rack based on this, but 12U instead of 20U and it will be open for more airflow.
ReplyDeleteTom, Thank you for making the guide. Purchased it and I'm almost complete. One step I do not see in the instructions is how to install the Cam Lock. Do you have anything that relates to this step. Never installed a lock and I've been looking through youtube for a demonstration of a L-Handle Cam lock install and haven't found anything great to follow yet.
ReplyDeleteI referenced these plans to build a 16U studio rack for a live audio application - I was very pleased with the results - the only thing I changed was to use 1x4 finish boards. I also attached the rails with 10-24 nuts and bolts at the top and bottom of each rail, along with wood screws every 3" on the rails, for extra strength. The end result may be less strong than with using 2x4s, however it'll be more than strong enough for the application (amplifier, mixer, wireless microphone receivers, desktop PC, HDMI matrix, 2 drawers and a power conditioner).
ReplyDeleteTom,
ReplyDeleteI'm the guy who has the unclaimed pictures (third from last) in your post. For some reason I'm unreasonably excited you found my pictures, and I just wanted to thank you for these plans! I've yet to have a single issue with the cabinet and recommend this build all the time to other colleagues with homelabs.
Great stuff. And thanks for featuring my build on your post!
-Joe
Hi,
ReplyDeleteGreat plans, thank you for posting this. One question: the 2x4's in the picture look as if they were planed, but I don't find a mention of planning the studs in the instructions. Did you plane all 2x4's on all sides?
Thanks,
I'm having trouble building this.. I can't know for sure about the calculations, because it's all in Inches...
ReplyDeleteCan you, maybe, convert it to metric units for other users around the world?
There is no direct Metric equivalent to the ALS measures. You'll have to settle for CLS measures.
DeleteI have almost completed building an enclosed rack, but one thing is bugging me: How do you secure it from falling eg, when you want to pull out one of the installed servers? It cannot be anchored, so I am thinking that installing adjustable feet in the front could potentially be kind of a solution
ReplyDeleteyou are a f..ing geniuussssssssssssssss tahnks :D
ReplyDeleteHi, I was wondering if you could give me an approximate screw count for each screw. I just need to know so I can get the right amount of screws. Thanks
ReplyDeletehi
ReplyDeletei'm building my wood rack but i need some advices, what is 2x4 stud in cm ? is it 5,08 x 10,16 ??
i have done a project with 35 cm x 55 cm..is it not enough ??
thank you for the help.
Finished mine up this weekend. Feel free to use any of the images if you like.
ReplyDeletehttps://imgur.com/a/DJlGdso
cool looks like i will be building one too this week
DeleteYou never stated in your instructions which way to turn the screw driver when installing the screws. Is it to the left or to the right?
ReplyDeletefor 90% of life, threads are oriented on screws, pipes, fasteners etc such that turning them clockwise tightens, counter-clockwise loosens.
DeleteThere is an old adage, "Righty tighty, lefty loosey."
Here are a few pictures from my build. I painted it white to match the office.
ReplyDeletehttps://imgur.com/a/u5lNzR8
Very nice! Thanks for sharing the pics.
DeleteThank you for creating this plan for us. I have been looking for a custom build that I can alter to my needs. I plan on making an old school Arcade Cabinet that is playable to house my server. I will link the pictures here when complete.
ReplyDeleteHere are some photos of the 2nd rack i built to house my servers, as i outgrew the 1st one.
ReplyDeleteI used furnace filters in the front door with exhaust fans because of dust issues in my basement.
The metal grill (a repurposed metal shelf) is to protect the filters from the cats.
http://fr.tinypic.com/view.php?pic=29ymw6e&s=9
http://fr.tinypic.com/view.php?pic=a4wzf6&s=9
http://fr.tinypic.com/view.php?pic=11qmsmt&s=9
I could only see one of the pics for some reason. It was of the side. It looked really nice! Thanks for sharing. If you click on the "Say Thanks To Tom" Link on the top right you can find my email address and email me the pictures directly.
DeleteTom --
Deleteoops. not sure how this is not working, i did test access to the photos with another browser. i will e-mail you the photos directly and add a fourth one (mid-build), to show there are fans on both sides.
Thanks for the ideas! I built one of my own with a couple slight modifications,and your guide was a huge help!
ReplyDeletePictures here: https://imgur.com/gallery/Q4XyKzN
Looks Great!
DeleteHi Tom,
ReplyDeleteThanks so much for posting this. I think I'm about to start getting the parts needed to do a 26U version. I did have a quick question though, do you have your rack counter-weighted at all? I'm just wondering if tipping over would be a concern for the rack on casters and a big 4U server extended out on its rails.
Thanks again. I can't wait to get started.
If built deep enough it may be fine. Mine is 19u at 28" deep for Dell rails. Bottom to top is a Dell 2900, x2 2650, x5 r200, two custom boxes, Cisco 3560, empty space, mikrotik css, and a Dell 15r. Mounted under the 15r from the back side is a cyber power 1500 ups. I can extend both 2650's and the 2900 at the same time and it wont tip over, and that has to be around 100lbs or so.
DeleteI don't know if that helps, but for my rack I installed some cabinet levelling feet similar to these ones here:
ReplyDeletehttps://www.rackcabinets.co.uk/media/catalog/product/cache/1/image/2000x2000/9df78eab33525d08d6e5fb8d27136e95/c/a/cabinet_feet.jpg
My rack is ~28"/70cm deep too and I have a rackmount UPS, a custom made server with 16x 3.5" disks, some HiFi equipement and a switch on the rear
My build from the plans http://imgur.com/gallery/gNFry4c
ReplyDeleteThanks for sharing that came out very nice!
DeleteDoes anyone have a source for non threaded rack rails? I'm interested in getting the ones that have cagenuts as that is what is better suited for the Dell Ready Rails. Thanks!
ReplyDeleteStarcase.com
Deletehttps://www.pennelcomonline.com/en/Rack-Rail-SQ-Hole/c-920.aspx
DeleteHi All,
ReplyDeleteI have 2 x super loud server and I need sound proofing in my DIY cabinet. Walls are OK but there are also holes for fans where sound is directly coming out through. Is there are any way to prevent sound from fan holes?
Regards
My ideal solution would be to run a duct from the fans to outside. Reduce heating in the room and help control sound. Thinking of doing that for mine when it's finished.
DeleteHello.
ReplyDeleteI am totally new to rack servers and I am thinking of getting one. :)
However, I have space limitations and I was thinking of putting it in a vertical rack.
But I see no tutorial online for doing that and I have never touched things like rails and racks before in my life. I would imagine it is easy to put the server vertically with the front looking upwards, since the server has some kind of "ears" on the front side. But what happens if you want to put it up-side-down, to allow the heat to move upwards in same direction the fans blow? I see no way to do this, yet people seem to do it somehow: https://serverfault.com/a/488250
Any tutorials or hints on this are welcome!
You can get a vertical rack like this one https://amzn.to/2VLLi3B I use a similar one for my switch and rack month battery backup. I doubt most home servers see much utilization and whether mounting normally or upside down is probably a nonissue. The vertical rack seems like it will be stronger in it's intended orientation though.
DeleteThanks for reply.
DeleteJust looking at the supporting piece of metal on the front side of the server in the image below (the piece that is extending from the server at the middle bottom side of the image), I cannot understand how you add such a thing on the other end, that misses it:
https://external-content.duckduckgo.com/iu/?u=https%3A%2F%2Fi.ytimg.com%2Fvi%2Fij_HGchBV_E%2Fmaxresdefault.jpg&f=1&nofb=1
I guess you have to do something different?
I am pretty curious and determined to try this, that's why I ask.
People online seem to do this often, but they give no explanation how they do it, as if it is something natural that requires no explanation. :(
Hm...
Just now I searched around the web randomly, and I think I found the answer!
I believe they use what is called "rack server ears":
https://www.google.com/search?q=rack+server+ears&source=lnms&tbm=isch&sa=X
I guess the ear must fit the server screw holes and it is not one design fits all...
Am I crazy? Is there a magical way to get 2 sides, 39" x 39", and top and bottom, 39" x 22", out of one sheet of plywood? Can't believe no one has commented on this yet - a second sheet of plywood adds a substantial cost to the rack. (Not to mention the extra trip to the hardware store I'll need to make.)
ReplyDeleteI think I will use my nice, thick sheet for the sides and pick up some thin luaun for the top and bottom.
Thanks for the plans, though, Tom. Been fun putting this together. Got the frame done - going forward with the enclosure now.
Hey Tom, I have been looking over your guide and It's really impressive, and looks great for starting a new home server setup, but I'm looking to keep it small, maybe 8u to 10u. I know you were talking about a 20u rack costing $400, closed. How much do you think the price will shrink if I make it around that size? I know that there are diminishing returns on saving, but I was hoping to get a rough estimate before I get started. Thanks again for the great build
ReplyDeleteWhat number wood screws would you recommend for attaching the rails to the 2x4s? I see you saw 1" screws in length.
ReplyDeleteVery nicely done. Now that you have had this awhile, do you think the 2X4's were overkill? Do you think using smaller lumber for the frame, ie:1X4's, would be sufficient?
ReplyDeleteDepends on the overall size. Mine is over 3 feet tall and holding several hundred pounds. 1x4 would crumble when i tried to move it. Glad mine is 2x4.
DeleteI think that if you rip some plywood into 3/4" x 3.5" and laminate (with gorilla glue) when needed, you would have a stronger non-warping frame.
ReplyDeleteI recently completed my build: https://imgur.com/gallery/FBEORfr
ReplyDeleteI had ups and downs, but finally got it together!
Isn't the comment about the attachment of the rails the other way around? The side with the variation of holes is screwed to the timber studs not vice versa.
ReplyDeleteOK if you are in the USA but not otherwise. Conversions from imperial to metric are easy but the killer is that US timber standard dimensions & other hardware needed are different to those available in OZ & probably elsewhere to.
ReplyDeleteThis becomes a nightmare unless you have a fully fledged carpenters shop which is an expensive proposition.
I am committed now but I wish I never started on it.
I don't have an array of power tools to deal with the dimensions of the timbers involved, ergo, 38mm timbers for the Kreg are not available here in Oz, so this means I have to glue 19x89's together alround, and that is an annoying and unwanted diversion. I was also somewhat nonplussed when I saw how pocket hole screws were expected to be enough to support the rack & its castors & that brackets might be needed to obviate an expensive collapse. Seems like a last minute design addition.
DeleteActually I think the time proven way of carpenters using more secure methods of attachment would be better. The pocket hole method here seems to be a lazy & not a completely desirable alternative.
3u mounted porch with just the kreg jig, a cordless hand drill, corded skilsaw, and ruler/scribe. This was 6 or so years ago and it's holding up fine. Have 1 5u and 2 3u dell heavy boiis on the bottom, 5 1u dell lite boiis above that, one 1u supermicro above that, used to have another 1u supermicro above that other one but has been removed last year. 1u mikrotik switch, a ups 3u mounted above all that but through the back, and a 1u dell server monitor station. Has survived one house move (pulled all servers and ups out during that), and multiple years with just pocket holes...
DeleteI built a home rack based on this design recently - mostly from 18mm plywood. It's fully enclosed with sound deadening foam throughout. I have 3 120mm fans wired on the front for intake, and the same on the back for exhaust. There is only 1x 5u server inside and I don't know if I'll ever increase on that. Loved making this, it was a great weekend project to learn a little woodworking.
ReplyDeleteCan such a design be use to hold a tabletop up? I want to build a desk, and put a table on top of bookcases on either end. Could this build serve as a support?
ReplyDeleteProbably would work ok as long as you gauged its strength.Mine is over 3 feet tall, full populated, and weighs several hundred pounds. It is also open frame with no sides or top covering. I would not add any extra stress to it.
DeleteThank you so much for posting this. I was able to build a decent 20U open rack for cheap followingv these plans, plus I learned how to make pocket holes! Well done!
ReplyDeleteThanks for the project, I bought the instructions, unfortunately there are no indications in cm/mm there, which can lead to errors.
ReplyDeleteIt would be nice if these could be added.
I purchased the rack rails and server rails prior to building this rack, and built it to fit them. Since I use all dell gear, I used the maximum depth for dell rapidrails so there is space behind to route wires and not protrude. The only change I would have made is to recess the front vertical rails to accommodate the dell server covers.
DeleteThanks for the plans. I made a 22u rack under 100€ used two fans 140mm for intake and one for outtake. Temperature is under 22 degrees and sound proof is quite good.
ReplyDeleteI know this original post is quite old, but the information is still quite relevant. I know know if the OP still keeps up with responses or will respond to me, but I have questions about a build I would like to do, using a moving dolly from Harbor Freight (https://www.harborfreight.com/30-in-x-18-in-1000-lb-capacity-hardwood-dolly-58316.html) and then using the OP's plans from there to complete the build.
ReplyDeleteI have a Dell PowerEdge r740xd attached to a PowerVault M1200 that houses 9 (8+1 spare) Seagate IronWolf Pro 22TB drives. This is a home server set up. The server measures nearly 28" from front to back (including the front bezel), 18.5 from left to right (including mounting ears), and 3.5" from top to bottom (I use these simplified terms so that it is clear what dimension goes where). The PowerVault is a little shorter, coming in at 22" from front to back (including the mounting ears).
My switch is a Cisco 2960x, which I would also like to include room for in my build.
However, my caveat is that I don't need a cabinet as large as the OP's. I want to build a narrower cabinet so I can stand the server and storage vault on their sides - making the dimensions 18.5" from top to bottom, 28" +/- front to back and 3.5" from left to right for each. This configuration is more efficient for the space I have available. However, I am unsure about the rack rails and how those would work or if I could even use them.
I am not new to woodworking or building DIY stuff, but I am sort of a newb when it comes to networking stuff and enclosures.
Ideally, I want to to dampen the sound significantly, while also providing adequate air flow and minimize dust.
Can any one please help me figure out the proper dimensions/materials needed?
Thank you.
Talk about a still-useful but quite old blog! In any event, as I was researching, I came across this page. I plan to build my own as I have grown weary at the terribly quality and high cost of many server racks nowadays and feel like a home-built DIY suits my farmhouse better anyhow. I do have one question that I cannot see to find info on. There is not a single tutorial on the matter that doesn't use the rails, and I get it. However, I was wondering why not just screw the equipment directly to the wood rails and skip the metal rails altogether? I have been mulling it over and can't think of a reason why not other than just making sure you have it level on each side. I guess maybe this wouldn't work too well with heavier equipment, but for switches, shelving, etc. it seems feasible.
ReplyDeleteThank you I'm glad you found my post helpful. The reason you don't screw directly to the wood is that if you're mounting a long heavy server, all that weight and force from only being attached to the front would cause it to strip the screws out of the wood. If you want to avoid the rails you would want to make sure you have something supporting the back of the server but that could mess up air flow or limit what you can put in it. The rack rails are pretty cheap.
DeleteI'm sure that in this pool of comments someone noticed step one being very off.... The rail should not be going from end to end on that piece of wood, because on the next image you've got the top and bottom face plates on that same piece of wood. This project already starts you off wrong
ReplyDeleteActually, the top and bottom faceplates are mounted on top of and underneath the side pieces, not between them. That means the rail should run end-to-end on the side wood—it’s not a mistake. Might be worth taking another look at the diagrams.
Delete