Kreg-Mini Cheat Sheet
Attic Storage Shelf Plans

I was browsing online for something unrelated for my attic when I came across this AtticMaxx Shelving System
Below you'll find plans to build an attic shelving system that solves some of the same problems the AtticMax does but at a fraction of the cost. I also made the bottom shelves a little longer which will allow you to slide out the bottom tote so you can access the contents after you spin it sideways.
Cost of GreenFiber Vs Atticat Blown In Insulation

First let me say there's a lot of competing information on which is better, fiberglass or cellulose insulation. Both can be blown into existing walls and attics without significant demolition. The people who mainly sell and install cellulose insulation think it's worlds better than fiberglass and those that manufacture and install fiberglass insulation think that's the best choice. I'm still trying to make up my mind what to believe but both options can be DIY projects and both choices offer a free blower rental with a minimum purchase from Home Depot.
Insulation recommendations changed a few years ago. If your home was built before 1990 there's a good chance you don't have enough attic insulation. If the level of insulation in your attic is at or below the floor joists, you don't have enough. If you can't see your floor joists in the attic because they're covered with insulation you're probably good.
If your home was built before 1980 you may not have any insulation in your walls. If your home was built before 1960 you more than likely don't have insulation in your walls. There's really no way to tell without making a small inspection hole in an exterior wall and visually checking.
To add insulation to existing walls without having to tear down all the drywall the only two affordable choices are blown-in fiberglass or cellulose insulation. Foam is way too expensive for me right now.
Here's what cellulose and fiberglass insulation is currently selling for at Home Depot in my area:
$11.48 for GreenFiber Blown-In Cellulose Insulation
$29.68 for Owens Corning AttiCat Fiberglass Expanding Blown-In Insulation System
When I first saw those numbers I got excited and thought I could blow in cellulose for a lot cheaper than I previously priced fiberglass. Unfortunately you need a lot more cellulose packages than you do fiberglass because the fiberglass is compressed. When it comes to walls it gets even worse which I'll explain after we look at the numbers for attics. Let's say we have a 1,000 sq ft attic we want to insulate by adding an additional R-30 worth of insulation. Here's what the numbers look like.
Attic Insulation Cost Comparison
| Insulation | Pkgs Needed | Price/Pkg | Total | Savings |
|---|---|---|---|---|
| GreenFiber R-30 | 44 | $11.48 | $505.12 | |
| AttiCat R-30 | 16 | $29.68 | $474.88 | $30.24 (5.99%) |
| OC Fiberglass R-30 Batts | 29 | $15.98 | $463.42 | $41.70 (8.26%) |
| GreenFiber R-38 | 59 | $11.48 | $677.32 | |
| AttiCat R-38 | 20 | $29.68 | $593.60 | $83.72 (12.36%) |
| GreenFiber R-49 | 81 | $11.48 | $929.88 | |
| AttiCat R-49 | 26 | $29.68 | $771.68 | $158.20 (17.01%) |
The costs above only reflect the cost of the insulation. You get a free 24 hour blower rental if you buy 20 bags of GreenFiber or 10 bags of AttiCat and we're above both of those and I assumed you'd need to rent a truck for either if you don't already have one. Although you're getting a lot more packages of GreenFiber so for some people, that may mean having to rent the HD truck instead of using their own truck.
R-30
If you're only adding an additional R-30's worth of insulation the cheapest option is to use Unfaced R-30 Batts that you just roll over your existing installation (perpendicular to your joists.) if you don't mind crawling around cutting insulation.If you'd rather blow insulation, AttiCat is slightly less than GreenFiber and not much more than R-30 rolls. Not a big enough difference to choose one over the other if you have a certain preference for either fiberglass or cellulose in my opinion.
R-38 and R-49
If you want to add an additional R-38 worth of insulation or more you really start to see significant savings with AttiCat. For some reason, GreenFiber's recommendations aren't linear. You need proportionally more insulation as you increase R-Value.
At R-30 you need about 2.75 times as many GreenFiber bags as you need AttiCat. At R-38 it's 2.95 times more and at R-49 it's over 3.1 times as many packages.
I think the labor will become an issue as well with cellulose. You have to load, unload, carry and feed about 3 times as many bags of GreenFiber as you do AttiCat.
Wall Insulation Cost Comparison
The following table compares the price for 2,000 square feet of 2x4 framed exterior walls.
| Insulation | Pkgs Needed | Price/Pkg | Total | Savings |
|---|---|---|---|---|
| GreenFiber R-13 | 98 | $11.48 | $1,125.04 | |
| AttiCat R-13 | 27 | $29.68 | $801.68 | $323.68 (28.77%) |
| AttiCat R-15 | 31 | $29.68 | $920.08 | $204.96 (25.58%) |
Things get a lot worse for cellulose insulation when it comes to blowing into existing walls. When installing blown-in insulation in walls you have to blow it in at a higher density than you do for attic installations.
This is true for both cellulose and fiberglass but fiberglass only needs double the amount while cellulose needs triple the amount. With AttiCat you also have the option to add a little more to get a higher R-15 insulation rating. With cellulose you'd probably start busting through your drywall?
Cellulose insulation settles a little bit compared to fiberglass so you really have to pack it in. When you do that, the settling is minimal. I'm guessing that's why it takes much more cellulose insulation compared to fiberglass.
Cellulose insulation settles a little bit compared to fiberglass so you really have to pack it in. When you do that, the settling is minimal. I'm guessing that's why it takes much more cellulose insulation compared to fiberglass.
You're saving a lot more money on material cost with fiberglass than with cellulose insulation even if you choose to go with the R-15 installation option of AttiCat. You're also dealing with about 1/3rd as many packages of insulation.
Conclusion
There are pros and cons to each but it's a bit difficult to discern what's truth and what's marketing. For example fiberglass is more affordable and provides good insulation but is itchy. Cellulose is treated with borates which makes it fire retardant and may repel pests and mold. It can be as much as three times heavier than fiberglass which could be an issue in some structures and if not installed to the correct density it can slump over the years leaving an uninsulated void at the top of the wall cavity.
Either GreenFiber or AttiCat is going to be better than not having enough attic insulation or any insulation in your walls if you live in a colder climate. Both can be installed by DIY'ers who spend time reading the instructions and preparing beforehand.
Either GreenFiber or AttiCat is going to be better than not having enough attic insulation or any insulation in your walls if you live in a colder climate. Both can be installed by DIY'ers who spend time reading the instructions and preparing beforehand.
For adding insulation to your attic at R-30 they're similar in cost but as you go deeper you realize more savings with AtticCat.
For adding insulation to existing walls you can save close to 30% with AtticCat versus GreenFiber and you'll need to deal with about 1/3rd as many packages of insulation. They're similar in size but the AtticCat is heavier because it's compressed. Still I think having to open and load that many more packages into the blower is going to get tiring and possibly slow things down.
You can get a free blower rental with either so other costs should be similar.
The numbers I calculated are from current prices in my area. Check to see what GreenFiber
and AttiCat is selling for in your area before you make any decisions.How To Wire A 66 Block

If you don't have a 110 block you may have a 66 block in your home. Phone companies can charge a monthly inside wire maintenance fee if you want them to repair any issues that may occur with the phone wires inside your home. If you learn to maintain your own phone system you can save a decent amount of money. For me it's about $120 every year.
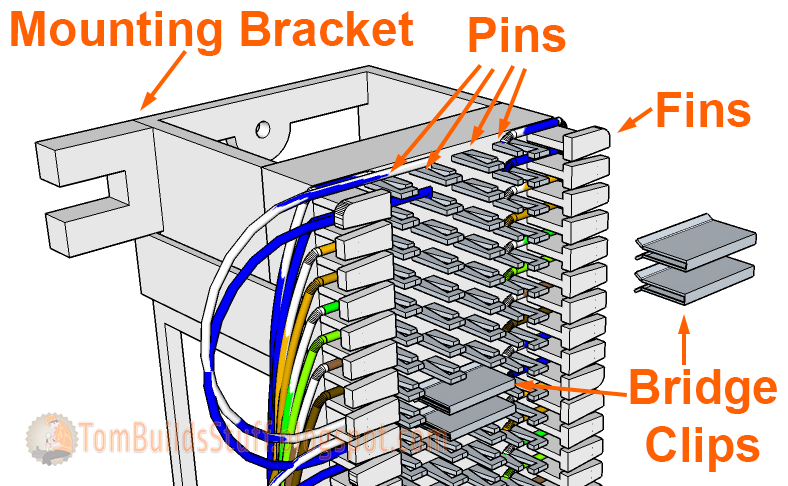
66 Block Components
There are different types of 66 blocks. The most commonly used is the 50 pair Split 66 Block.

The 66 block is normally mounted on an 89D Mounting Bracket to provide some clearance to run cables behind the 66 block.

Pins in the center of the block are were wires get connected. On a split 66 block there are 4 pins on each row. The first 2 pins on a row are electronically connected, as are the last 2 pins on a row but the 4 are independent of each other. If you connect a wire to pins 1 and 2 the signal from the wire on pin 1 will also flow to the wire on pin 2 but not to pins 3 and 4.

If you want the signal from pins 1 & 2 to flow to pins 3 & 4 you would install a metal bridge clip over pins 2 & 3.
They're normally mounted vertically but to fit larger illustrations in this article I'm going to be showing them in a horizontal orientation.

A 50 Pair split 66 block will have 25 rows of pins which allow you to punch down 50 pairs of wires, 25 on each side. With old style 4 pair (green, red, black, yellow) telephone wire you can punch down 12 cables on each side. With newer style Cat5e wire (white-blue, blue, white-orange, orange, white-green, green, white-brown, brown) you can punch down 6 cables per side.
Fins on the sides of the 66 block are meant to keep wires separated from each other. Some of the fins are slightly rounded to help you identify every 10th wire. You can write on the fin with a permanent marker or apply labels to them for identification.
66 Block Vs 110 Block
66 blocks are older style wiring blocks for telephone wiring but many telecom installers still prefer them. They're more durable which allows them to be punched down multiple times and are able to handle thicker wires that may be present in older installations.
I personally prefer the 110 blocks. They serve the same function but take up less space. 110 blocks are also more compatible with high speed networking which can save a lot of time if you want to upgrade to VOIP phones in the future.
Durability isn't an issue for me because neither should really be reused and I like that the connections in a 110 block are in the C-Clips instead of on the base so if the connector goes bad you just replace the C-Clip, you don't have to always replace the whole block as you would in a 66 block.
Step 1: Installation

66 blocks are typically screwed to a mounting board which can be a simple sheet of plywood. Above the 66 block, 2 wiring spools (mushrooms) are also installed to neatly route cross connect wires from one side to the other or between blocks if multiple are installed.
Step 2: Punch Down Incoming Phone Lines
The cable coming from your phone company could be a 4 conductor (red, green, black, yellow) cable that supports 2 phone lines or it may be a Cat3, Cat5 or Cat5e cable with 3 or 4 pairs of wires, each pair supporting 1 phone line.
All cables should come up through the bottom of the 66 block and then pulled out the side.
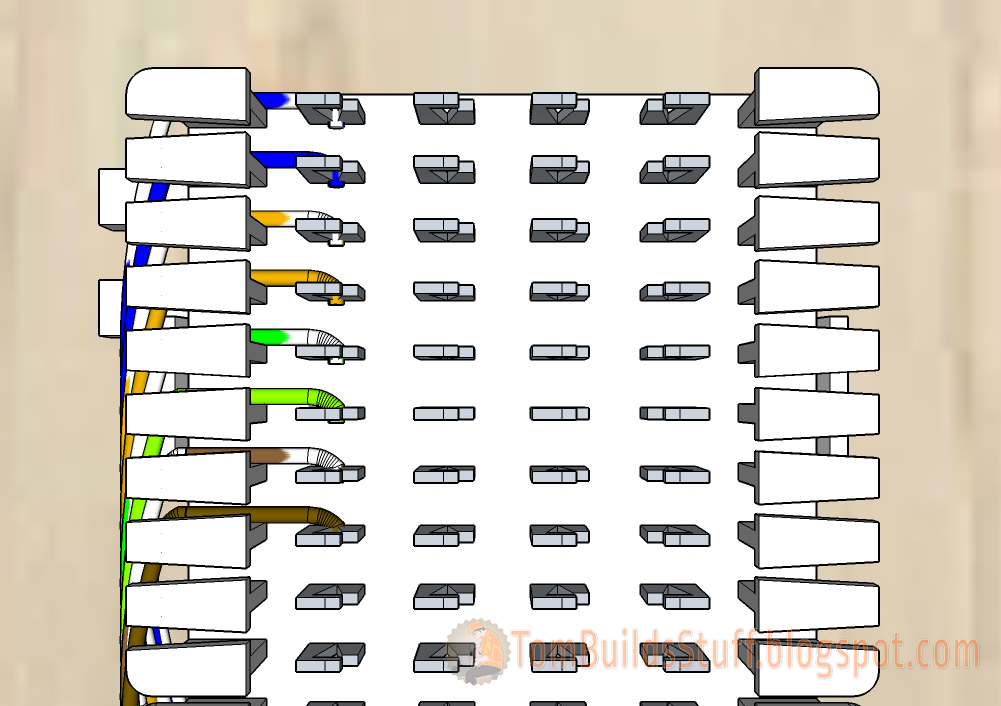
On a 66 block incoming wires are typically punched down on the left side of the block starting from the top.
Each wire is punched down to the first pin in a row with one wire per row. The order of the pairs is blue, orange, green and brown with the white wire from the pair being punched down on top. That's white-blue, blue, white-orange, orange, white-green, green, white-brown and brown.
Untwist each pair only as much as you need, pass it through a fin then hook it onto a pin from the top down. After you have all the wires from a cable on the pins, punch them down using a punch down tool with a 66 blade.
Step 3: Punch Down Phone Jack Cables
Now it's time to connect our premise wiring, the cables that run from our distribution point to the phone jacks throughout the house. These cables will be punched down on the right hand side of the 66 block using Cat5e cable. Each cable is going to use 8 pins and the order of the wires is again going to be blue pair, orange pair, green pair, brown pair with the white wire of each pair on top. Even though you may not use 4 lines in each cable it's still good practice to punch them all down.

I've highlighted the different cables with an orange box to make it easy to see in the illustration. Each cable will run to a different jack to allow one phone to be connected to it.
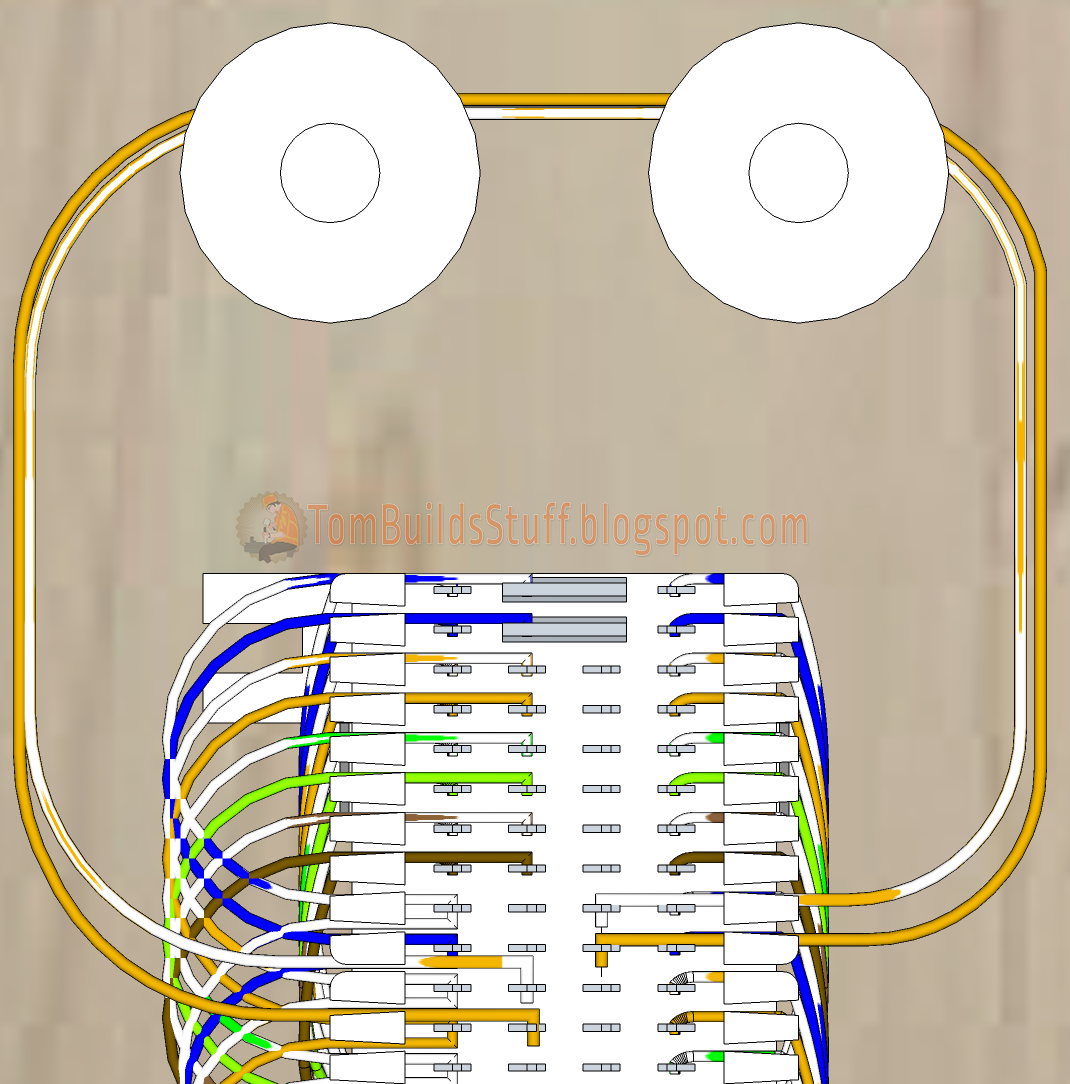
Step 4: Create Incoming Lines Daisy Chains
Right now our incoming lines aren't connected to any of the phone jacks since we're using a split 66 block. There are a number of ways to send the signal to each jack but the preferred method is to use cross connect wires to duplicate the signal to other pins on the left side of the block. This allows you to use bridge clips when you want to send a particular line to a phone.
We'll start with the blue pair, line 1.

Start by attaching the wires to the second pins where you punched down the incoming phone lines (left in illustration) then loop the cross-connect wires and and out of the fins so you can hook them around every 8th pair of pins as shown.
Keep the twists in the cross-connect wires as much as you can. For the illustration they're untwisted for clarity.
When you punch down the cross connects you'll need to switch to a non-cutting 66-blade in your punch down tool so you don't trim the wires when you're creating the daisy chain above.

If you have multiple incoming phone lines, repeat the daisy chain process for each line or all the punched down wires so you have them if you need them.
Step 6: Attach Bridge Clips
The jacks still aren't connected to the incoming lines but we'll do that right now.
In our example we want to send line 1 to all of our phone jacks. To do so all we need to do is insert a bridge clip between pins 2 & 3 for all the blue pair wires.

Each phone is now connected to line 1 from the phone company.
If you want to connect other lines to phones, insert a pair of bridge clips to the corresponding pair of wires.
Step 7: Alternate Cross Connect Method
Using bridge clips is the best method but sometimes you may want to do something a little different like have incoming line 2 be the line that a phone sees as line 2.
For example you have a home office and you only want your office phone line to be connected to that phone. Instead of using bridge clips you'll use cross connect wires coming out of the left side connected to pins 2 of an orange pair, looping around the top of the mushrooms and then punched down to pins 3 of the blue pair that leads to your office phone.
If our office phone was the second cable on the right, instead of using bridge clips our cross connect would look something like this.
Bad Dishwasher Smell Keeps Coming Back? Try This!

Tom Builds A New Web Design

Choosing Daylight or Warm Color Bulbs

X16 Small Business Phone 110 Wiring Diagram

How to Wire A 110 Block Telephone Connector

Office Organization: What You Need To Know