


Disclosure: This post may contain affiliate links; if you buy through them, we may earn a commission at no extra cost to you.
As an Amazon Associate I earn from qualifying purchases.
Safety & accuracy: DIY work involves risks. Use proper PPE and follow local codes and tool manuals. Plans/measurements can vary, verify all dimensions and materials before cutting or wiring.
Safety & accuracy: DIY work involves risks. Use proper PPE and follow local codes and tool manuals. Plans/measurements can vary, verify all dimensions and materials before cutting or wiring.

Every so often I try to get rid of things I don't need any more by selling them on Ebay or Craigslist. I've found that having good photos helps items sell faster and get better prices so I made this little table top light box to take better product photos. It was made mostly of things I had lying around. Here are plans to build one yourself.
Understanding Shadows
Nothing screams out amateur quality photo more than dark harsh shadows. Lighter, softer shadows make product photos more pleasing and give a more accurate depiction.There are three main parts of a shadow. The umbra, penumbra and antumbra. The umbra is the darkest part of the shadow where all light is obstructed by the object. The penumbra and antumbra are lighter, softer portions of the shadow where some light gets through.
When you use a small light source, like the itty-bitty flash that's built into your camera, the shadow is mostly umbra.

If your light source is large, in relation to the object you're photographing, the umbra becomes smaller and there is a sizable penumbra.

Please excuse the crude diagrams, it should be clearer once you see the sample photos.
The way the light box works is by making your light source effectively larger so you get softer, more pleasing shadows. In addition, all the light bouncing around helps make the shadows lighter and provides more even illumination.
Here's an example. There are more examples at the end of this post.

|
| DIY Light Box with One light on left |

|
| On Camera Flash |

|
| Standard Ceiling Light |
If you don't want to make your own there are a number of different Table Top Studios
What You'll Need
Materials
I'll go into more details on materials throughout the steps but basically, you'll need the following:- 2 Sheets of 22" x 28" White Foam Board (or thick package type cardboard).
- 2 Sheets of 22" x 28" White Poster Board (10 pack about $6.50 from Staples)
- 10 small Binder Clips
- Glue Stick or Spray Adhesive
- Packaging Tape
- Diffusion material (see steps for details)
Tools
- Utility Knife
- Scissors
- Straight Edge
- Pencil
- Tape Measure
Cut Plan
You can use either a thick package type cardboard to make the light box or foam core. To standardize things a bit I'm using 22" x 28" of foam board for these plans. I was in the middle of recycling when I made mine and wound up using cardboard.My local Staples didn't carry 22x28 foam board except for the tri-fold presentation boards which aren't the best choice for this. You might be able to find that size at an art supply store or you can get it online from Amazon.
Here is how we'll cut the foam core. If you're using cardboard, cut the relevant shapes out of whatever you have. Sizing isn't all that critical except for the 22" width and the 14" depth. I just eyeballed most of it.

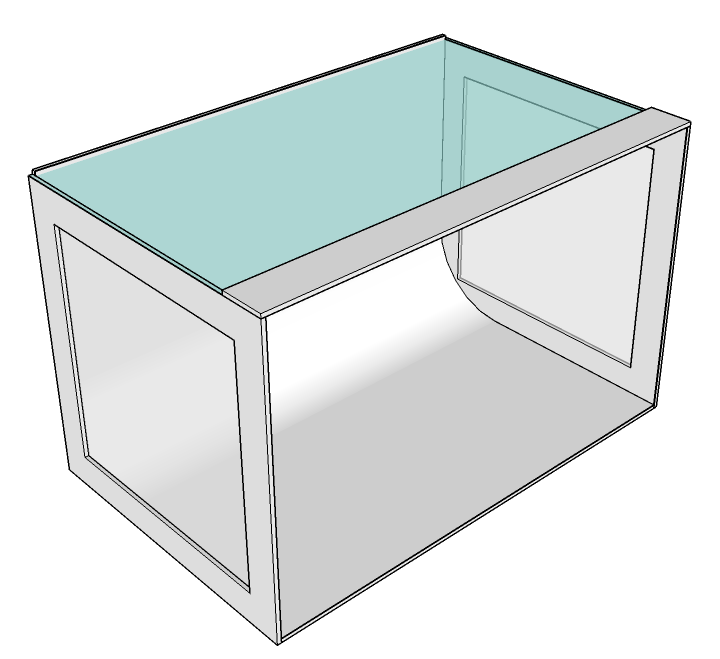
Step 1: Back and Bottom
Take one sheet of 22x28" foam core and score it down the middle (14") so that you can bend it at a 90 degree angle. If you're using cardboard cut 2 14" x 22" pieces and tape them together along the 22" side to form an L like shown.
Step 2: Cut Out Sides
The sides are 14" x 14 3/16". The 3/16" comes from using 3/16" thick foam core. Ideally the sides would be 14 3/16" x 14 3/16" but it's such a small difference it's not worth buying another sheet of foam core for.After you cut the 2 sides, measure and mark a square about 1-1/2" in from all 4 edges and cut it out with a utility knife. Keep this inner portion to use as a reflector later.

Step 3: Apply Diffusion Material To Sides
To make the light effectively larger we need to diffuse it. The standard is to use a white ripstop nylon fabricI just used some white tall kitchen garbage bags as my diffusion material. Two layers worked best for me.
Using glue, attach the diffusion material to the inside of each side so that it covers the entire side. Diffusion material shown in blue for clarity.

Step 4: Attach Sides and Top Support
Cut out a 2" or so strip of foam core or cardboard that is 22" long + 2 times the thickness of the foam core (or cardboard). Attach the sides (with the diffusion material on the inside of the box) and the top support as shown using packing tape.
Step 5: Insert Poster Board
The main background of this light box is going to be a 22" x 28" sheet of white poster board. Slide it into the box (shiny side up), leaving a soft curve in the corner and attach it to the back and bottom with the binder clips. The binder clips make it easy to change the background if it gets damaged or to change the color.
Step 6: Attach Top Diffuser
Cut and attach more of your light diffusing material for the top of your box and attach it with binder clips. I removed the binder clips holding the poster board one by one to attach the top diffuser to the back. Make sure the diffuser passes under the top support, especially if you're using brown cardboard for the frame.The diffuser is blue in the illustration for clarity.
Step 7: Reflectors
To help bounce more light to the front of the object being photographed were going to make some reflectors out of the left over foam core and the inner sections we cut out of the sides. If you're using cardboard, make sure to cover one side with poster board cut to size. You can also cover the back side in a black material to act as a light block if you wish.To keep the reflectors standing up on their own we'll make 4 feet. Two for each reflector in use.
Cut out 2" high pieces of foam core from the section shown in the cut plan and make a notch in each to slide the reflector in. The width of the notch will depend on the thickness of the material you're using. I was able to just eyeball these cuts. They don't have to be that precise.

To use the reflectors, just slide 2 feet on to the bottom to make it stand upright.

Using Your Light Tent
Now you'll need some lighting to be able to take good photos. This doesn't have to be that complicated as the light box will make most kinds of lights look better.You can use 1, 2, 3 or more lights with your light tent. One on one side, one on each side, one or two on the top, one on each side and also one or two on the top. Different configurations will give you different results. Just make sure you keep the light about 8-12" away from the diffuser.
You can also use small desk lamps or whatever you have handy. Having some sort of reflector is best.
For the bulbs you can pretty much use anything that is a safe wattage to use with the light fixture you've chosen. Modern digital cameras are pretty good at white balancing. It's best to use the same exact type of bulb in each light fixture or you might get strange color casts.
For simplicity and better color reproduction you might want to pick up some of these Alzo Digital 85 Watt 5000K CFL bulbs. They are very bright and produce a color of light that simulates daylight. Just like camera flashes do.
You can also use camera flashes if you have them. For the sample shots below I used a single hot shoe flash
A tripod to mount your camera on is also important, especially if you're using bulbs instead of flashes.
I'm using
Sample Photos
This is what my light tent looks like in action. I'm using two flashes. One connected to my camera with a cord and the other triggered wirelessly.
Play around with adjusting the lights and reflectors to get different effects. Here are some examples.

Here are some more photos I took of different objects I had lying around after I finished construction of my homemade light tent.

|
| One Light Left |

|
| One Light Above with Glossy Background |

|
| One Light Left |

|
| One Light Left |

|
| One Light Top |

|
| One Light Left |


I'm going to build this today for a photography project in my advanced photo class at Texas A&M. Thanks for posting!
ReplyDeleteBobby
Can you clarify the size of the little easels, height and width please, thanks.
ReplyDeleteThe size of the small reflectors and reflector feet aren't critical. Use whatever is left over. The height should be about 3 inches.
DeleteThanks for this detailed and cost efficient post! You solved my problem.
ReplyDeleteBuilt this yesterday. Thanks for the excellent guidelines.
ReplyDeleteYou're welcome. Glad I could help.
Delete