


This article represents my own opinion and may contain affiliate links. Please read my disclosures for more information.

Everything you need to know to build drawer boxes for your woodworking projects in this drawer building tutorial.

When I first tried to learn how to build drawers for one of my projects I had a difficult time finding all the information I needed. After researching the topic and now having had some experience I thought it would be nice to outline everything you'll need to know in one place.
What You'll Need
If you'd like to help support the site you can purchase a printable PDF of this article for only $4.95.

Materials
- 1/2" or 5/8" plywood for sides
- 1/4" plywood or tempered hardwood for bottoms
- (8) Pocket Hole Screws per box
Tools
- Table saw or circular saw with guide to cut plywood
- Router, table saw or circular saw with guide to cut dados
- Miter box, power miter saw or table saw to cut to length
- Kreg Pocket Hole Jig
- Drill
- Tape measure
- Straight edge
Step 1: Drawer Box Construction Overview
Before we get into the details let's take a look at a typical drawer box construction. There are many different ways to build drawer boxes, some require special tools and skill while others are are very simple but not very strong or attractive. I think that using pocket hole joinery for drawers achieves a great balance between strength, appearance, cost and ease to build. That is the method I'll be describing.
Below is an image of an assembled drawer box minus the drawer slide hardware.
Below is an image of an assembled drawer box minus the drawer slide hardware.

Using a separate drawer box and drawer front makes it easier to construct the drawer and provides more flexibility when aligning the drawer front on the cabinet.
The drawer consists of 6 main components. The drawer box sides, front and back, the drawer box bottom, the exposed drawer front and the drawer pull. 2 wood screws are used to secure the drawer front to the drawer box, 2 machine screws hold the drawer pull in place. Not visible are 8 pocket holes and screws that attach the back and front to the sides. The bottom sits in a dado (groove) cut into the sides, front and back.
Here is an exploded view of the drawer to give you a better sense of how it is constructed.

Step 2: Choosing Wood For Your Drawer Box
Before anything else, we need to determine the type of wood we'll use for the drawer sides and bottoms.
For the drawer sides your options in order of best to worst are: solid wood boards, veneered hardwood plywood, MDF and melamine coated particle board. Because drawers tend to get abused a bit I prefer to use plywood for drawer construction as it's more durable than MDF or particleboard. Solid wood boards are nice but usually overkill and much more expensive. I like PureBond 1/2" Maple Plywood because maple has a tight, closed grain and the light color is good for drawer boxes. PureBond is also formaldehyde free.
Drawer box side thickness should be at least 1/2" but if you can find 5/8" plywood your boxes will be stronger. Unless you're building large drawer boxes for very heavy items or large file drawers 3/4" sides won't be necessary.
For the drawer bottoms solid wood boards haven't been commonly used for many years for most drawer construction because of cost. 1/4" thick plywood is good enough for most drawers. PureBond 1/4" Maple Plywood is great for drawer bottoms. Another good choice that is about 1/2 the cost is
1/4" Tempered Hardboard
is great for drawer bottoms. Another good choice that is about 1/2 the cost is
1/4" Tempered Hardboard . Tempered hardboard is dark brown and not as attractive as plywood but is strong enough for drawer bottoms, easy to find and cheaper than plywood. From what I remember it was used for the drawer bottoms at labs in scool.
Drawer box side thickness should be at least 1/2" but if you can find 5/8" plywood your boxes will be stronger. Unless you're building large drawer boxes for very heavy items or large file drawers 3/4" sides won't be necessary.
For the drawer bottoms solid wood boards haven't been commonly used for many years for most drawer construction because of cost. 1/4" thick plywood is good enough for most drawers. PureBond 1/4" Maple Plywood
Step 3: Drawer Box Width
There are two main factors that will determine the outside width for your drawer box, the width of the opening the drawer will be installed in and the side clearance required by the drawer slides you are using.
I like to measure the opening width after I construct and finish the cabinet carcass. Sometimes things don't always go as planned and plywood thickness can vary. By doing this I get a more accurate measurement. I measure not only the front but also at a point in the back and use the smallest measurement if they differ. This is important because with many drawer slides there is very little tolerance.
Standard epoxy coated drawer slides (like the Blum 230M Epoxy Coated 3/4 Extension Self Closing Slides pictured right) need a 1/2" clearance on each side of the drawer box. The clearance requirements should be available through the slide manufacturer.
To determine the outside dimension of the drawer box take the inside opening measurement and subtract 2 times the side clearance.
In our example the opening width is 12", 2 times 1/2" equals 1" so our final outside drawer width will be 12" - 1/2" - 1/2" or 11".
Some people like to also remove an additional 1/16" from the outside width because the drawer slides do have some tolerance and it's easier to shim the slide if necessary than to remove material but I do not do that. The reason is that plywood tends to be a little bit thinner than advertised and the way I measure and build my drawer boxes already makes them come out a little bit narrower than the actual measurements. I'll explain it more further down.
Step 4: Drawer Box Height
There are two situations you might run into when trying to determine the height for your drawer boxes. One is where there is a constrained height for the opening where the drawer will be installed such as the top drawer of a european style cabinet or drawers installed into face-frame cabinets.
Constrained Height
When the height of the drawer opening is constrained it is important to measure the actual opening dimensions. I do this after the cabinet carcass has been assembled and finished. I also measure both sides and in the case of any slight discrepancy I use the smallest measurement. Next it is a matter of allowing for proper top and bottom clearance as detailed in the specifications for the drawer slide.

Standard epoxy coated slides need a 1/4" bottom clearance and some top clearance to allow them to be more easily removed. I subtract 1" from the opening height to allow for the 1/4" bottom clearance and 3/4" top clearance.
In our example the opening is 5-1/2" so our drawer box height will be 5-1/2" minus 1/4" bottom clearance minus 3/4" top clearance equals 4-1/2" height for the drawer box.
Non Constrained Height
In some cases you may install drawers into a cabinet where there is not a separate opening for each individual drawer, such as the bottom portion of a european style cabinet.

In this situation the drawer front height should already be known and I make the drawer box height 1-1/4" shorter than the drawer front. In the case of a 10" drawer front height, the drawer box height will be 8-3/4".
Step 5: Drawer Box Depth
Determining the appropriate drawer box depth is a little more complicated than determining the other drawer box dimensions. To get the best use out of the drawer the main driver for the depth of the drawer box will be the size of the drawer glides you use. For example, if you're using these Knape & Voigt 22" Economical Full Extension Drawer Slides  you'll want to make your drawer boxes 22" to get full advantage of the full extension feature. Figuring out what size drawer slides to buy will be determined by your cabinets construction and size.
First you need to measure the inside depth of your cabinet where you'll be installing your drawer. Measure from the back of the cabinet to the front of the cabinet as shown.

If you're cabinets will have overlay drawers, where the drawer front sits in front of the cabinet body as pictured above, take the measured depth of the cabinet and look for a drawer slide that is 1 to 2 inches shorter than that measurement. The size of the drawer slide you selected will determine the length of your outside drawer depth.

If you're cabinet design calls for inset drawers, where the drawer fronts will be installed flush with the front of the cabinet, then you need to account for the thickness of the drawer front. In the above example we'll have a 3/4" thick inset drawer front installed in a cabinet with a depth of 16". That means we'll be looking for a drawer slide that is an inch or two less than 15.25" and build our drawer box depth so it matches the size of the drawer slide we'll select.
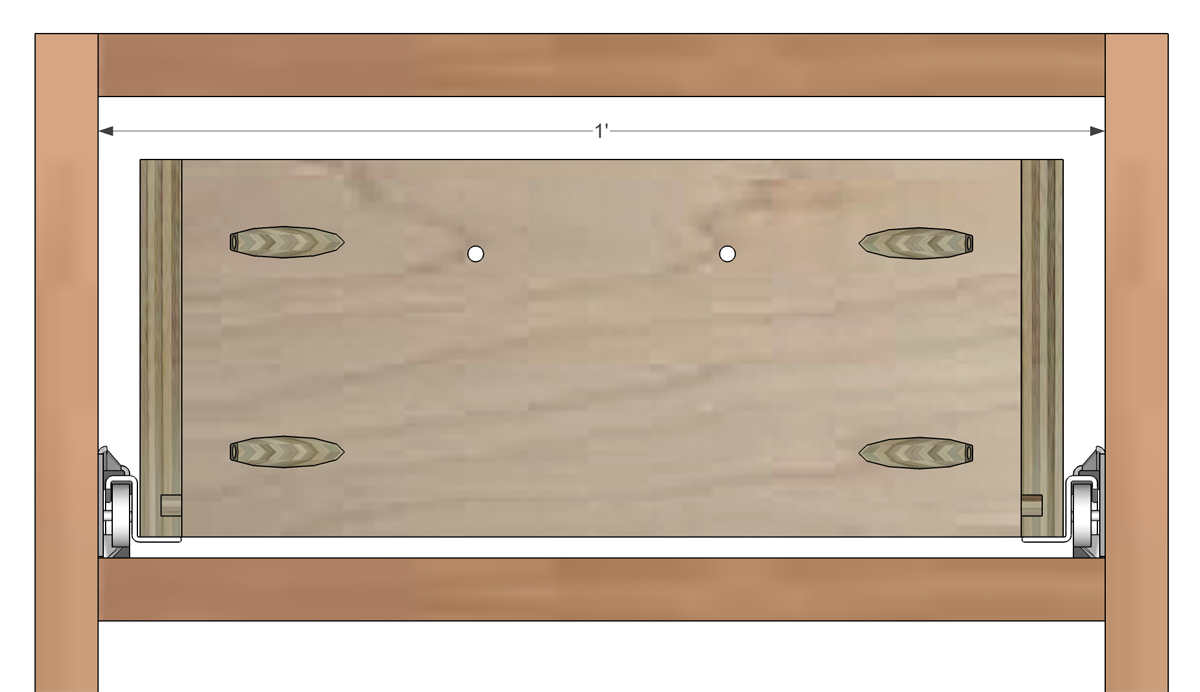
Step 6: Length of Drawer Box Sides, Front and Back
Now that we've determined what the outside dimensions of our drawer box should be, we'll need to figure out the length of each piece that makes up the outside perimeter of the drawer box. In the example we've been using we've determined our drawer box dimensions are 11" wide, 15" deep and 4-1/2" high.
Before we continue let's have another look at an assembled drawer box for reference.
Drawer Box Sides
As you can see from the illustration the length of each drawer box side is simply the overall outside dimension of the drawer box. In our case, 15".
Drawer Box Front and Back
Because the drawer box front and back fit between the sides it needs to be shorter than the outside width of the drawer box.
To determine the length of the front and back pieces take the overall outside width of your drawer box and subtract 2 times the thickness of the side pieces.
In our case we're using 1/2" plywood and our desired outside width is 11" so the length of our front and back pieces will be 10".
I mentioned earlier that the side clearance for the epoxy drawer slides are not actually 1/2" but 1/2" + 1/32" (17/32"). I don't account for the extra 1/16" (1/32" for each side) because plywood tends to be thinner than marked by about 1/32".
You should verify the thickness of your plywood with something like a Neiko 6-Inch Digital Caliper . Standard tape measures don't have markings down to 1/32" but if you don't have calipers you can stack 2 side pieces on top of each other and measure their combined thickness.
To determine the length of the front and back pieces take the overall outside width of your drawer box and subtract 2 times the thickness of the side pieces.
In our case we're using 1/2" plywood and our desired outside width is 11" so the length of our front and back pieces will be 10".
I mentioned earlier that the side clearance for the epoxy drawer slides are not actually 1/2" but 1/2" + 1/32" (17/32"). I don't account for the extra 1/16" (1/32" for each side) because plywood tends to be thinner than marked by about 1/32".
You should verify the thickness of your plywood with something like a Neiko 6-Inch Digital Caliper
Step 6: Layout and Cut Drawer Box Sides, Fronts and Backs
I like to reduce waste when cutting lumber as much as possible which is why I always mock up my cut plan before hand. Buying one less sheet of plywood can be the difference between a DIY project that saves significant money and one that doesn't. I include the cut width (kerf) in the plans as well so I don't wind up with an unexpectedly short piece.
For most projects you'll be building multiple drawer boxes so the following cut plan is laid out for 2 of our 11" x 15" x 4-1/2" drawer boxes. It consists of 2 10" backs, 2 10" fronts, and 4 15" sides cut out of a 2' x 4' sheet of 1/2" plywood.

I think the drawer boxes look nicer when the length of the piece follows the grain of the plywood which is why I layout the side pieces along the long end of the plywood. I make my rip cuts first and then trim to length with a power miter saw. I always make sure there are a few inches at the end of each ripped piece in case I need to extend the length of any of the components for some unforseen reason.

Dado

The bottom of the drawer box fits into a dado (groove) cut into the bottom of the side, front and back pieces. It does not get glued into place but rather floats in the groove to allow for expansion of the wood.
Since we're using 1/4" plywood for the drawer bottom our dado needs to be 1/4" deep and 1/4" wide. The dado should be cut a minimum of 1/4" from the bottom but if you want a stronger drawer box for storing heavier items space the dado 3/8" or even 1/2" up from the bottom.
How we plan to cut the dado will determine how we proceed cutting the drawer side components.
If You DO Have A Table Saw Or Router
A table saw is the best tool to use to get accurate, repeatable rip cuts for the drawer side components. You can also use it to cut the 1/4" dado or you can use a router table or router with guide. If you don't have a table saw but you do have a router you can rip the plywood with a circular saw and guide then cut the dado with the router. In either case the procedure is the same.
- Rip the long 4-1/2" strips of plywood using either your circular saw and guide or table saw.
- Cut the dadoes using either your table saw or router.
- When it's time to assemble the drawer boxes trim the pieces to the correct length using a miter saw.
If you don't have a table saw or router and don't want to buy one but you do have a Dremel rotary tool you can use it with a guide and a Dremel 654 1/4" Straight Routing Bit . Using it along with this Dremel 231 Shaper/Router Table
 makes it easy to make consistent daos in the drawer. The bits dull fairly quickly so you might want to pick up a spare and remember to feed the drawer side slowly and make 2 or 3 shallow passes instead of trying to cut the full depth of the dado all at once.
If You DON'T Have A Table Saw Or Router

If you don't have a table saw or router with a router table or guide don't worry. You can still cut out your drawer box components provided you have a circular saw and circular saw guide. The order of your cuts will be slightly different.
- Mark out all your cut lines on the plywood. This includes both edges of the dadoes and don't forget to account for the cut width (kerf) of your saw blade when measuring out multiple rip cuts. Mark the cuts so you know which lines represent the dados and which lines represent the rip cuts. Each cut should have 2 marking lines, one for each side of the cut. Using different colors might help. See picture to right for details.
- Set your saw blade to only cut 1/4" deep into the plywood. Test it out on a scrap piece to be sure you're not cutting too deep.
- Lay your saw guide along each dado and cut out the dado with your circular saw. Take your time. Depending on the kerf of your saw you may need to do 1 or 2 more passes to get the desired 1/4" width. It's easier to cut all the dadoes before ripping the strips.
- Set your saw blade to cut through your plywood and proceed to rip out the strips for your draw sides.
- Use a miter saw to cut the components to length when it's time to assemble the drawer boxes.
I've done this before but it's very important to lay out each side of the cut accurately and take your time setting up your saw and guide so you don't mess it up.
Step 7: Assemble Drawer Box Sides
With all the drawer box sides cut we can now begin assembling the drawer box.
Start by drilling 4 pocket holes on the front and back pieces using a Kreg Pocket Hole Jig. The pocket holes should be drilled on the side opposite where the dado is cut. Make sure you don't drill a pocket hole over the dado. For larger drawers you may require additional pocket holes. Pocket holes should be no further than 6-8" apart.
Once the pocket holes are drilled, screw the drawer box together as shown.

Make sure that the drawer box dimensions are correct and that the box is square before proceeding. If not make any necessary adjustments.
Step 8: Cut and Install the Drawer Bottom
With the drawer box assembled we can take final measurements so we cut the drawer bottom precisely.
Measure the inside dimensions of your finished drawer box and add 3/8" to each dimension. This allows a little room inside of the dado for expansion.
In our case our inside dimensions are 10" x 14" so we'll need to cut a 10-3/8" x 14-3/8" rectangle out of our 1/4" plywood. I like to cut it so the direction of the grain runs from left to right when installed in the drawer but this isn't that important and will cut in either direction if it makes more efficient use of the plywood.
With the drawer bottom cut to size unscrew the pocket holes from the back of the drawer box and carefully slide the drawer bottom into the dadoes on the drawer box sides.

Place the drawer box back in place and make sure everything still fits correctly and the drawer box is square. Screw and glue the drawer box back together and your drawer box is now complete.
Step 9: Finishing
Before going on to finishing, if you have a router you can ease the edges of the top of the drawer box sides with a round over bit or aggressively sand it to get rid of the sharp edges.
Sand the drawer box with 80 grit, then 120 grit sand paper to smooth out any rough spots or tool marks.
Staining drawer boxes usually isn't necessary but a polyurethane coating will help protect the drawer box and keep it clean. Avoid using oil based sealers on drawer boxes because they can out gas for years and that's not something you want in an enclosed space like a drawer. For drawer boxes I like to use Minwax Water-Based Polycrylic .
.
All that's left to do is install the drawer slide hardware in your cabinet, position and attach your drawer front and drawer pull.


Great guide, thank you.
ReplyDeleteYou're welcome :) And thanks for taking the time to let me know this was helpful.
DeleteThis is somewhat of a newbie question but when it comes to cutting the Dado, should the width match exactly to the thickness of the plywood? I ask because I'm using 1/4" birch plywood but as you probably know it really measures 3/16" thick, not 1/4". So, should my Dado be 3/16" or 1/4" to ease assembly? Thanks!
ReplyDeletePhil,
DeleteSorry for the delayed response. I had responded twice and for some reason it's not here. Hopefully this time sticks.
If you're asking because you don't have a 3/16" bit or easy way to make 3/16" dadoes then you'll be okay with a 1/4" dado is most cases. 1/16" isn't going to make that much of a difference. As you probably know plywood isn't exactly the same width throughout. There's some variation and would expands and contracts a little with changes in temperature and humidity. A little bigger is better than too small. You should always test to make sure you're dadoes fit the plywood on some scrap as there could be other variables.
thanks this helps a lot!!!
ReplyDeleteI've been contemplating building drawer boxes vs buying premade from Barkerdoor.com...this guide makes me wonder why I ever considered buying. Thank you for taking the time to put this together!! Wonderful information here!!
ReplyDeleteNice guide. I'm curious: under what conditions would you add additional reinforcement such as metal angle brackets and/or corner blocks? Or is that only necessary for, say, a larger drawer or stand alone furniture? I've found that the heavy use with heavy load drawers in the kitchen (utensils) just don't hold up.
ReplyDeleteThis was exactly what I was looking for. We live in a 6 year old home and a couple of pots and pan drawers are falling apart. Very Poor construction.
ReplyDeleteI have a table saw but need a dado blade. I guess this gives me the excuse to purchase one. I have all the other necessary tools including the Kreg tool. (Great Tool)
I wish there was a click to print on this article. I'll try to print it but usually a lot of other stuff gets printed. Thank you.
Tom: The graphics in your articles are great. Assuming you do your own illustrations, what tools do you use?
ReplyDeleteThank you. I do my own illustrations. It's mainly Sketchup for 3D modeling, Kerkythea for rendering and a graphics program for tweaks.
DeleteGreat page on building drawers from pocketholes. I had trouble pinning it using your link, so I pinned it directly. Nice clear and easy to follow.
ReplyDeleteClear instructions, very helpful, thanks
ReplyDeleteGreat article, thanks. Please clarify if the front and the back are glued to the sides or only the back.
ReplyDeleteEagleman, sorry I could have sworn I replied to this earlier. I've been having a problem with the commenting for some reason. I glue all 4 sides... Front back and sides. Just don't glue the bottom or the actual drawer front.
DeleteThanks - it's clear instructions like this that has me planning to make my own cabinets. One question, though, what about the front face?
ReplyDeleteSteveMann, for the front face you can simply cut a piece of 3/4" plywood and edge band it. I keep getting requests for drawer fronts and cabinet doors but haven't had time to post the instructions yet. You can also buy premade drawers and door fronts.
DeleteTom
ReplyDeleteThanks for the article I want to make several cabinets for the shop and dreaded making the joints whether they be dove tail or one of the other style this will make it much easier the Kreg system is my favorite way to make many of my projects simple and fast and it holds together.
Ray
Where do you find PureBond Maple Plywood?, and is Baltic Burch also a good choice.
ReplyDeleteDan, it's available most places that sell Columbia Forest plywoods. Many Home Depot's carry it or can have it delivered to the store. I have links above that bring you directly to the pages on the Home Depot website where you can order it and have it ready for pickup. Baltic birch is a very good choice too but I like that PureBond is formaldehyde free and easier for me to get. I think cheaper too.
DeleteHey Tom,
ReplyDeleteI have a Kreg K4, not the micro version. Will that bit size be too much with half inch plywood drawers?
The standard Kreg drill bit size has worked fine for me in 1/2" plywood.
DeleteHi Dan,
ReplyDeleteThank you very much for putting this excellent guide together. I am using it to build my 54" bathroom vanity with 8 drawers. I think my biggest challenge will be mounting the side mounted push-to-open drawer slides and gettign it aligned correctly. Could you please explain whether it is necessary to screw and glue the drawers? Thanks.
-Sri
Hey there Tom!! Your Blog was very helpful. I feel that I can complete my workbench drawers. Thanks for being there and being so knowledgeable.
ReplyDeleteHey Tom, I wanted to ask what is the thing that stops a cover of a sliding lock on a box or case from sliding completely off?
ReplyDeleteIs the top of the cover made slightly bigger to prevent it from going off completely?
Anish... I honestly have no idea what you're talking about and what it has to do with drawer boxes. Can you please clarify?
DeleteHey Tom, what's the thing on a box or case that has a sliding lock that keeps the cover from sliding of completely?
ReplyDeleteIt looks so easy. I am going to try it.
ReplyDeleteThank you for such clear instructions. The only question I have is what size screws do you use to attach the sliders to the inside of the cabinet. I am using 22 inch slides, putting a board between the slide and cabinet side to allow for face frame cabinets. The slides are the white euro full extension. The pull out is 22 inches wide. Thanks
ReplyDeleteHello Thanks so much for such wonderful instructions.
ReplyDeleteWhat size screws should be used to fasten the slides to the cabinet walls? I am using full extension 22 inch euro slides with a board between the slide and the cabinet to allow for face frames.
Hi Tom
ReplyDeleteIm new to the DIY scene and I was wondering could I build this ( and most things ) with just a Table Saw and Drill?
Hi Tom- I'm struggling with the proper slide size. I'm building and wall unit from 16" melamine, with three drawers at the bottom portion and shelves above the drawers. The drawer faces will be overlay. The back of the unit will be attached to the back of the melamine sides, so the interior dimensions will be 16" deep, front to back. Can I use a 16" slide, like this one, and build the boxes exactly 16" front to back? Or do the boxes and slides have to be smaller?
ReplyDeletehttp://www.amazon.com/dp/B00E8AF0P8/ref=wl_it_dp_o_pC_nS_ttl?_encoding=UTF8&colid=33IXWYFVI2Q4Y&coliid=I1LN8TVJMHJDVD
Thanks,
Scott
Hi Tom,
ReplyDeleteThanks so much for this great article ! Love your blog!!
Thank you so much for your article. It is really helpful! I would like to ask if I
ReplyDeletedo not have a dado cut, can I just use the brad nail gun to nail the drawer bottom to the drawer box? I am thinking using 1/2 inch plywood for the drawer bottom to make it stronger.
I am thinking the same thing. Why make it more complicated than needed. Once its full of junk no one would know. I am more worried about it falling out on someones foot than what the bottom looks like. But good info, and a super cheap option. Thanks.
DeleteHi Tom-great article. thank you. I'v got ~6 cabinets to add sliding shelves. I'm thinking of building sized boxes with 2 sliding shelves each to insert and secure into each opening. Seems I could build them in my garage and just secure the completed assembly inside the openings. Do you see any problem with this approach. thanks
ReplyDeleteGreat guide mate, I have little experience working with wood but I was able to make a working drawer with your help. Some advice I'd add is to provide a conversion to metric units as I'm in Australia and needed to constantly change the units. Keep up the awesome work.
ReplyDeleteTank you, very good instructions. I am building 14 drawers now using this method. However since I am using solid 5/8 " hardwood boards for the boxes sides I will add a glue line to prevent the joint from getting loose.
ReplyDeleteRegards
Castorbrico
Tank you. Great instructions. I am building 12 drawers using this method. However, since I am using 5/8" solid hardwood for the sides I will add a glue line to prevent the joint from getting loose.
ReplyDeleteRegards
Wow. Tom build cool stuff!... Thanks Tom, this is just what I was looking for.
ReplyDeleteHey Tom, nice instructions for the drawer build,
ReplyDeleteI am building a set of 6 drawers set in a cabinet/frame how do I go about accurately fitting the drawer fronts, so they line up and are square, there are no cross members between the drawers
Thanks Martin
Great tutorial! Very easy to follow with pictures included.THanks.
ReplyDeleteHi, I want to know how I can download your post so that I can read during my spare time. I just started wood worki
ReplyDeleteng apprenticeship and your post will be of great help and importance to me.
Thanks for all the info you have been posting.
ReplyDeleteIf you use half inch hardwood or BB plywood for the drawer sides, what size pocket hole screws do you use? I'm used to working with 3/4" material and 1-1/4" fine thread screws.
ReplyDeleteFinally: multiple choices reflecting available equipment. Made my first drawers with a hand drill and a saber saw. Prefer table saw. Today's adhesive materials permit making functional drawers using 45 degree strips and glue. The most important lesson comes from our computer age...GIGO. To produce quality requires thought, concentration, preparation and patience. This instructable reflects lessons learned and gives us a choice of hitting the nail on the head or the nail on the thumb.
ReplyDeleteThanks for share your tips. I'm not a professional woodworker but I love woodworking and I can do some simple things. I can use router and hand saw. I think I can do that box with your instruction above.
ReplyDeleteThis is the best drawer tutorial in the Internet. Very good instructions concise and simply the B E S T ! Thanks, Tom.
DeleteGreat instructions. What size screws did you use with your Kreg jig? Kreg recommends 3/4 in screws but I find that they are too short in 1/2 in plywood
ReplyDeleteI ordered 3/4 and realized they would be too short. I used 1 inch without any problems.
DeleteI ordered 3/4 and realized they would be too short. I used 1 inch without any problems.
DeleteExcellent well written guide. Many Thanks!
ReplyDeleteAwesome tutorial. Thank you very much. YouTube videos are okay references for this type of construction, but this beats any of them...by far.
ReplyDeleteWhat is that tiny kitchen drawer for?
ReplyDeleteKitchen Drawer
It is far easier to do this kind of project if you drill the shelf holes in the standards and attach the outsides of the drawer slides before you ever assemble the center unit. Paint after drilling the holes and before attaching the slides.
ReplyDeleteHi Nick, sorry, but I'm going have to take a more critical (albet constructive) view. In my humble opinion, this is too complicated. a) why use 2 pieces of wood for the face? when 1 will do.
ReplyDeleteb) no need to use 'glides', just make the opening just a tad bigger and put on internal shelf (again use 1/4 wall board). the drawer will slide back and forth on that, and won't tilt down. to stop it from coming out, put small vertical peg in back as catch.
sorry, but I was looking for 'simple' drawers with common tools.
just my opinion.
cheers
To address the points above...
Deletea) Why not have the drawer front be the front of the drawer box? Having the drawer front separate from the drawer box allows greater flexibility to account for any regularities when attaching the drawer front. It's an easier design for those with less experience and less tools than you'd find in a cabinet shop.
b) Why use glides? The point of this tutorial was to create drawer boxes that can be equivalent to cabinets you would buy. These use glides which provide smoother operation and have some other nice features such as soft close, and full extension. They also don't wobble as much with glides. I wouldn't use wall board (in the US wall board means drywall) since it's too brittle and creates dust.
Exactly what I needed. Thanks!
ReplyDeleteI am building a storage bed; drawers will be approximately 17" wide, 8 1/2" high, and 40" long. They will hold clothing, linens, etc. Will 1/2" plywood be the right thickness for the bottom? If so, does this mean my dados need to be 1/2" deep and that my sides would need to be 3/4"? (The plan I am working from calls for 3/4" for the whole thing, sides and bottom.) Thanks for your help.
ReplyDeleteGreat article!
ReplyDeleteI do not have a dado set for my table saw but just make multiple passes until I get desired width of groove for bottom.
ReplyDeleteThanks a lot for the step by step info for building cabinet and drawers .
ReplyDeleteThanks a lot for the step by step guide
ReplyDeleteVery nice guide for people who have all the tools (Kreg, table saw, etc.) However, I really don't want to have a full wood working set up in my garage. When I make drawers (and I have made dozens for my home), I have all my cuts made at a local lumber yard that has a VERY accurate table saw. I DO use a mitre saw and a jig saw for minor adjustments. All my boxes are made of 1/2" Baltic Birch. I do not slip in a 1/4" bottom using a dado but rather slip in a piece of 1/2" Baltic Birch. The bottom is flush with the bottom of the sides so the drawer is actually a little deeper than if you use the 1/4" bottom plus dado.
ReplyDeleteAll sides and the bottom are assembled using high quality wood glue and 1" brads with the holes pre-drilled to avoid splitting. After 20 years all my drawers are square and solid. Just rebuilt ALL my kitchen cabinets using the same process. Took a little longer but again, my garage is not full of wood-working equipment. :)
There are instructions on how to cut the drawer boxes. There's a section titled "If you don't have a table saw or router". This is the way I cut most of my drawer boxes up until the time I wrote this article as I didn't have a table saw or router. I built full cabinets including drawer boxes cutting down full 4' x 8' sheets of plywood with a circular saw. I have a number of jigs on my site if you're interested.
DeleteYou "predrill" for your brad nails? That is the first I have ever heard of someone doing this.
DeleteCheers
IMO, that is to allow you to use a cheaper, lighter bottom material. Probably important when someone is making lots of cabinets to transport to another location. Personally, I do as you suggested and just use a 1/2" bottom panel. It costs a little more and weighs a little more but you don't need to deal with making a dado cut. You can also use the same material for the sides and the bottom which for me, at least, means less waste. However, I do not use MDF for drawers but prefer Baltic Birch. It costs more but holds up much longer, accepts nails and screws better and looks a lot better, too.
ReplyDeleteHi when you cut the grove for the bottom of your drawer using the table saw do you have a special blade 1/4 wide dado blade? I don’t so what would be the best (accurate) method for getting a 1/4” wide grove with a 1/8” blade other than adjusting the saw fence 1/8” every time?
ReplyDeleteI don't either and I didn't even have a table saw until recently. I just move my jig over a little bit and make another pass. With this kerf blades it would take 3 passes. If you have a table saw just move the fence. Not the most efficient way to cut dadoes but I don't build cabinets or drawer boxes regularly.
DeleteTom,
ReplyDeleteMy cabinet depth is 18, my drawer depth would be 17 1/4 for recessed fronts, my slides would be 17inch? Or could I use 16 inch as they seem easier to find? Thanks
Try to get the 17" unless you're okay with having the back of the drawer about an inch further back when fully extended than it normally would. If the 16" are much cheaper I'd go with them though.
DeleteGreat guide when it was made and still great guide in 2019!! Thank you!!
ReplyDeleteThe 1/4"space below the dado is so a 1/4" piece of wood can float freely in the dado above it. Wood expands and contracts and this method helps to ensure the drawers don't twist or what not from being restricted by a bottom that does not move (like nails would create). Also, you would not want to use pocket holes to hold a 1/4" bottom on. For starters, all the holes would be exposed.
ReplyDeleteYou can not have a dado if you do not have the 1/4 of wood beneath it. If that wood ws not there, you would have a rabbet (spelling is correct, it is not a "rabbit").